
10 Essential AutoCAD Commands for Beginners: A Complete Guide
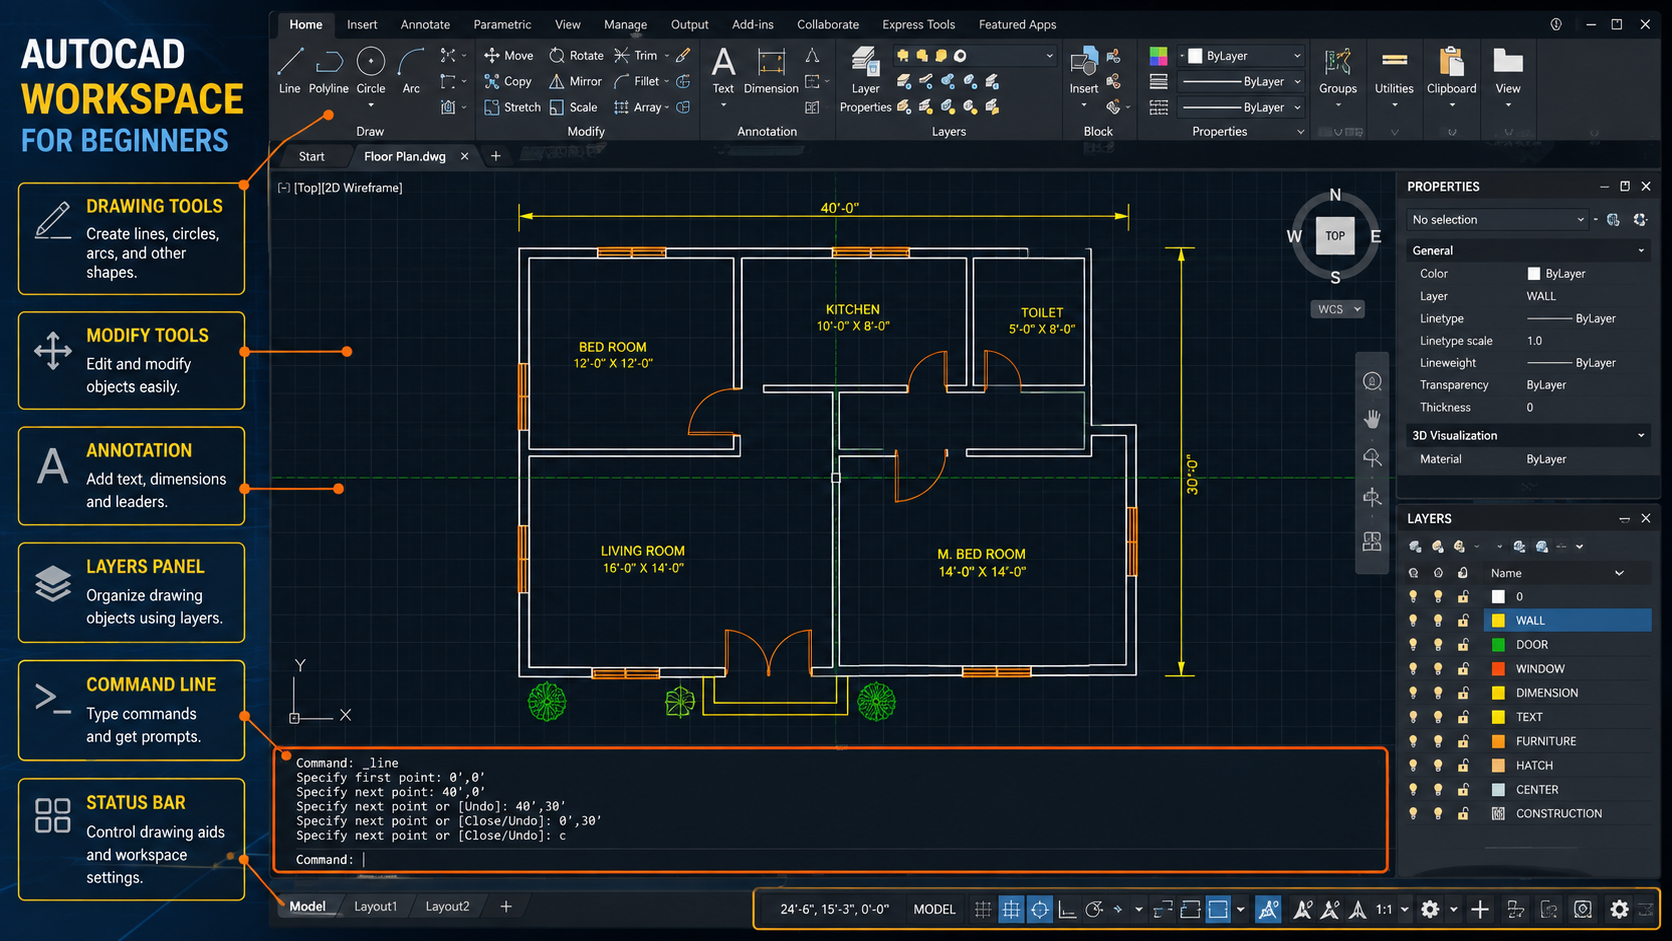
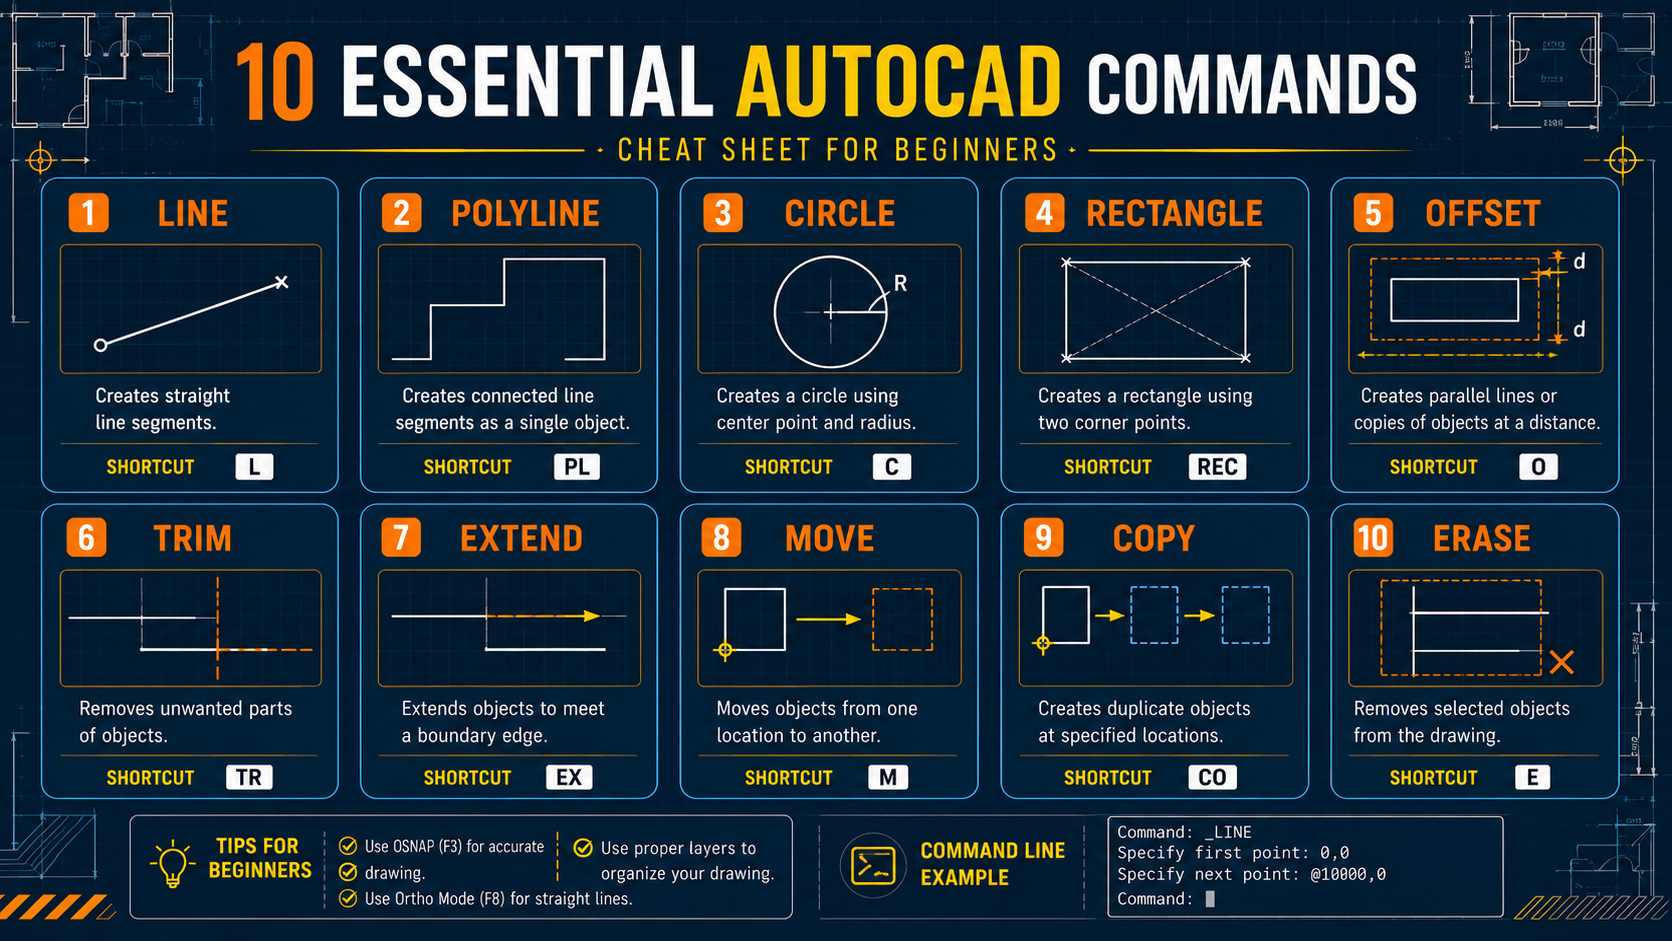
Today, we will explore 10 essential AutoCAD commands for beginners in detail. Learning AutoCAD becomes much easier once you grasp the most important commands first. Whether you are a student of architecture or civil engineering, a drafter, or a complete novice, mastering basic AutoCAD commands will enable you to create accurate 2D drawings more quickly and effectively.
In this guide, let’s look at these 10 essential AutoCAD commands for beginners. We will explain what each command does, its keyboard shortcut, and how it can be applied in architectural and civil engineering drawings.
If you are completely new to AutoCAD, you can also explore the official AutoCAD tutorials for beginners to understand the interface and basic CAD workflow.
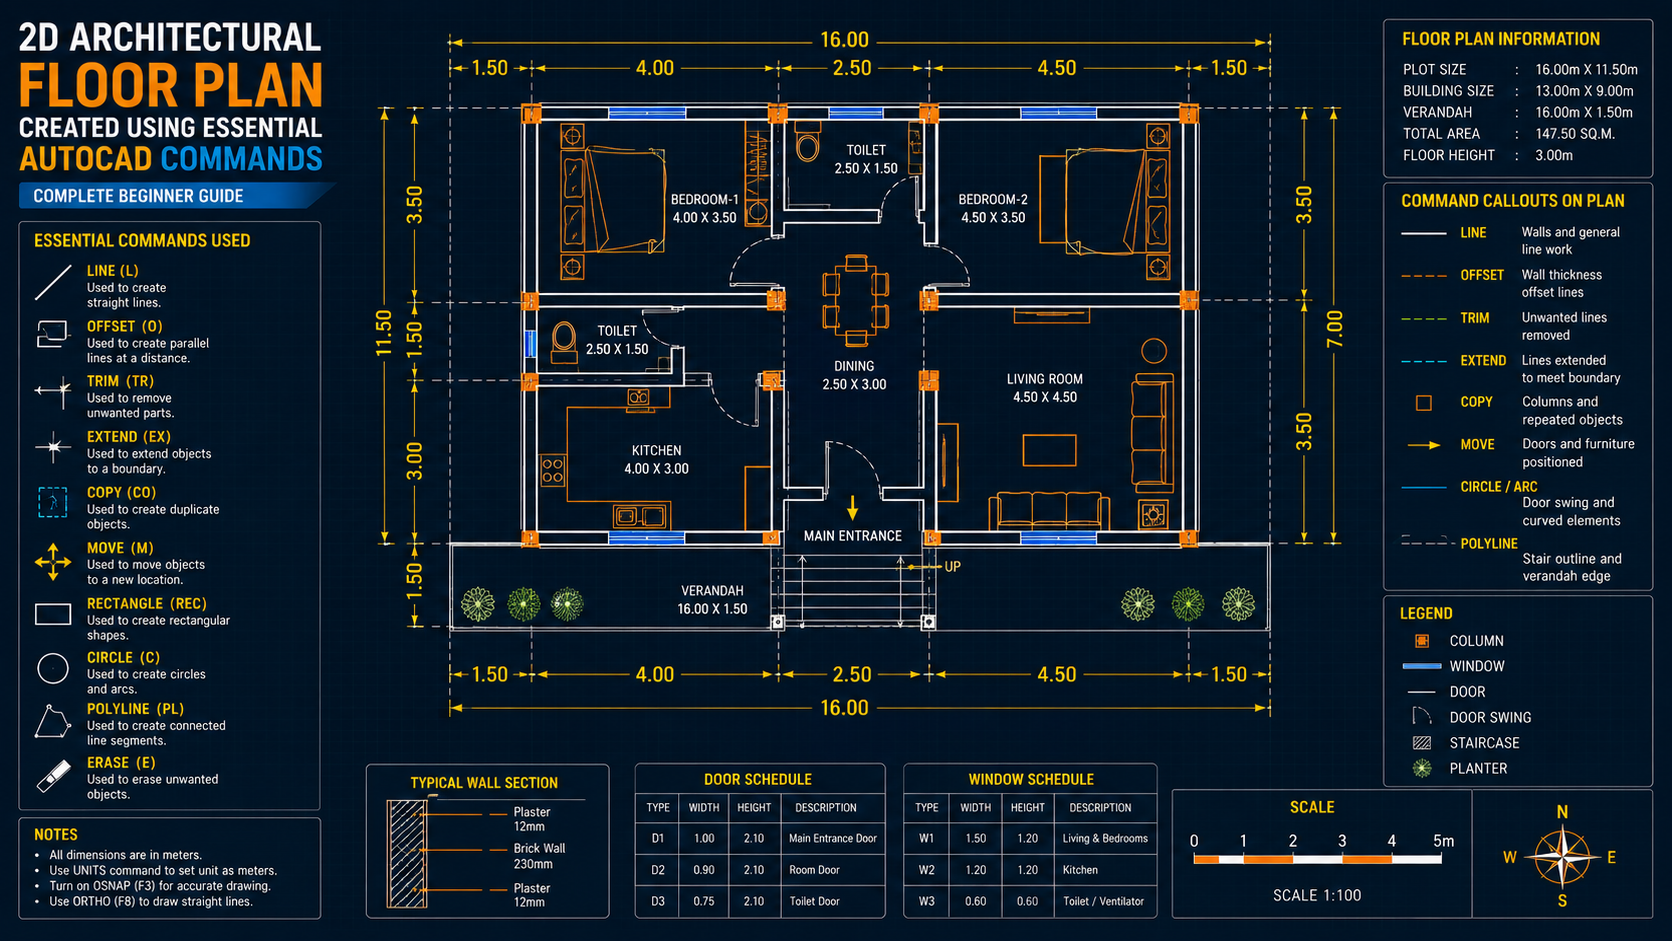
AutoCAD is widely used for creating accurate architectural floor plan drawings and 2D construction layouts.
Introduction to AutoCAD Commands
First, let us understand what AutoCAD commands are. AutoCAD is a computer software application; its full name stands for ‘Automated Computer-Aided Design.’ AutoCAD commands are instructions used to create, modify, measure, and manage drawings. Instead of searching through menus for every tool, you can type the command or its shortcut directly into the command line.
For most beginners in AutoCAD, learning a few frequently used commands is the best way to boost confidence and improve drawing speed.
Why is it important to learn AutoCAD commands?
Learning AutoCAD commands offers several benefits when designing drawings:
- Creating drawings faster
- Increasing drawing accuracy
- Easily modifying objects
- Reducing repetitive tasks
- Working efficiently on architectural plans
- Creating civil engineering drawings
- Understanding
- professional AutoCAD workflows
For a broader overview of AutoCAD tools and workflows, refer to the AutoCAD essential commands guide.
1. LINE Command — L
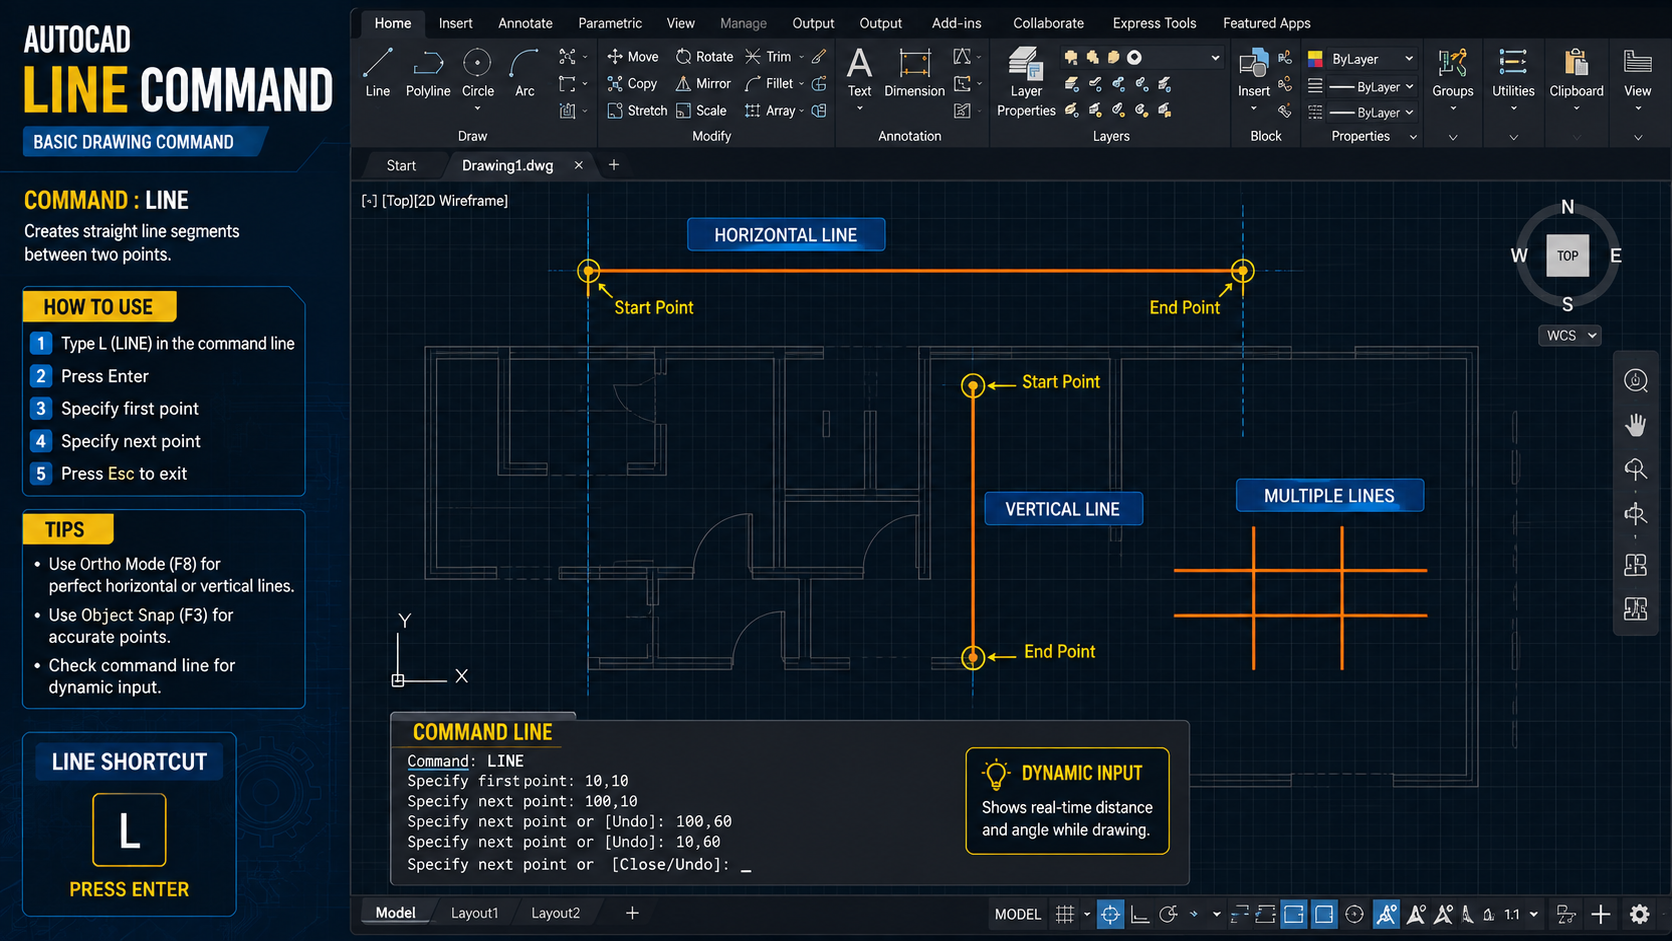
The LINE command is one of AutoCAD’s most basic and frequently used commands. It allows you to create a straight line between two points.
Shortcut
- L + Enter
Example
You can use the Line command to create:
- Wall reference lines
- Dimension lines
- Structural grid lines
- Construction details
- Floor plan elements
Tip for beginners
Turn on Object Snap (OSNAP) when accuracy is important. This helps you select precise points, such as endpoints, midpoints, and intersections.
2. POLYLINE Command — PL
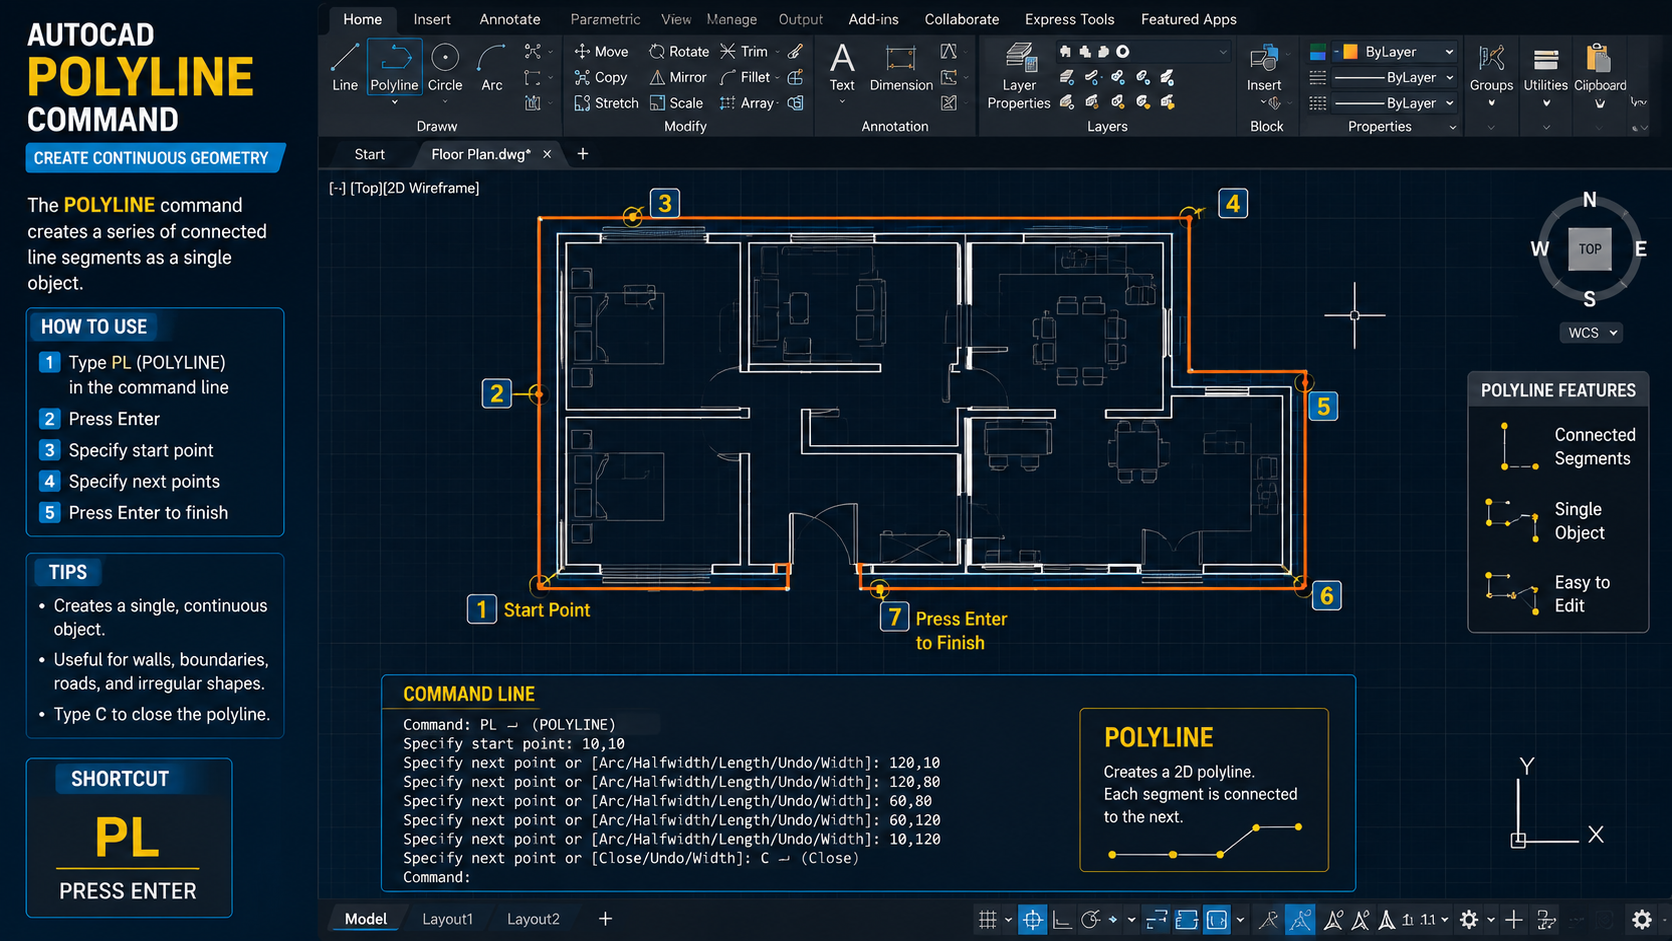
The POLYLINE command creates connected line and arc segments as a single object.
Shortcut
- PL + Enter
Unlike individual LINE objects, a polyline functions as a single, continuous object.
How to use POLYLINE
- Type PL.
- Press Enter.
- Select the starting point.
- Select additional points.
- Press Enter to finish.
Where is POLYLINE useful?
Polylines are useful for:
- Floor plan boundaries
- Property boundaries
- Roads
- Site plans
- Irregular shapes
- Closed profiles
Tip for beginners
A closed polyline is very useful when creating boundaries for an area or performing other drawing operations.
3. CIRCLE Command — C
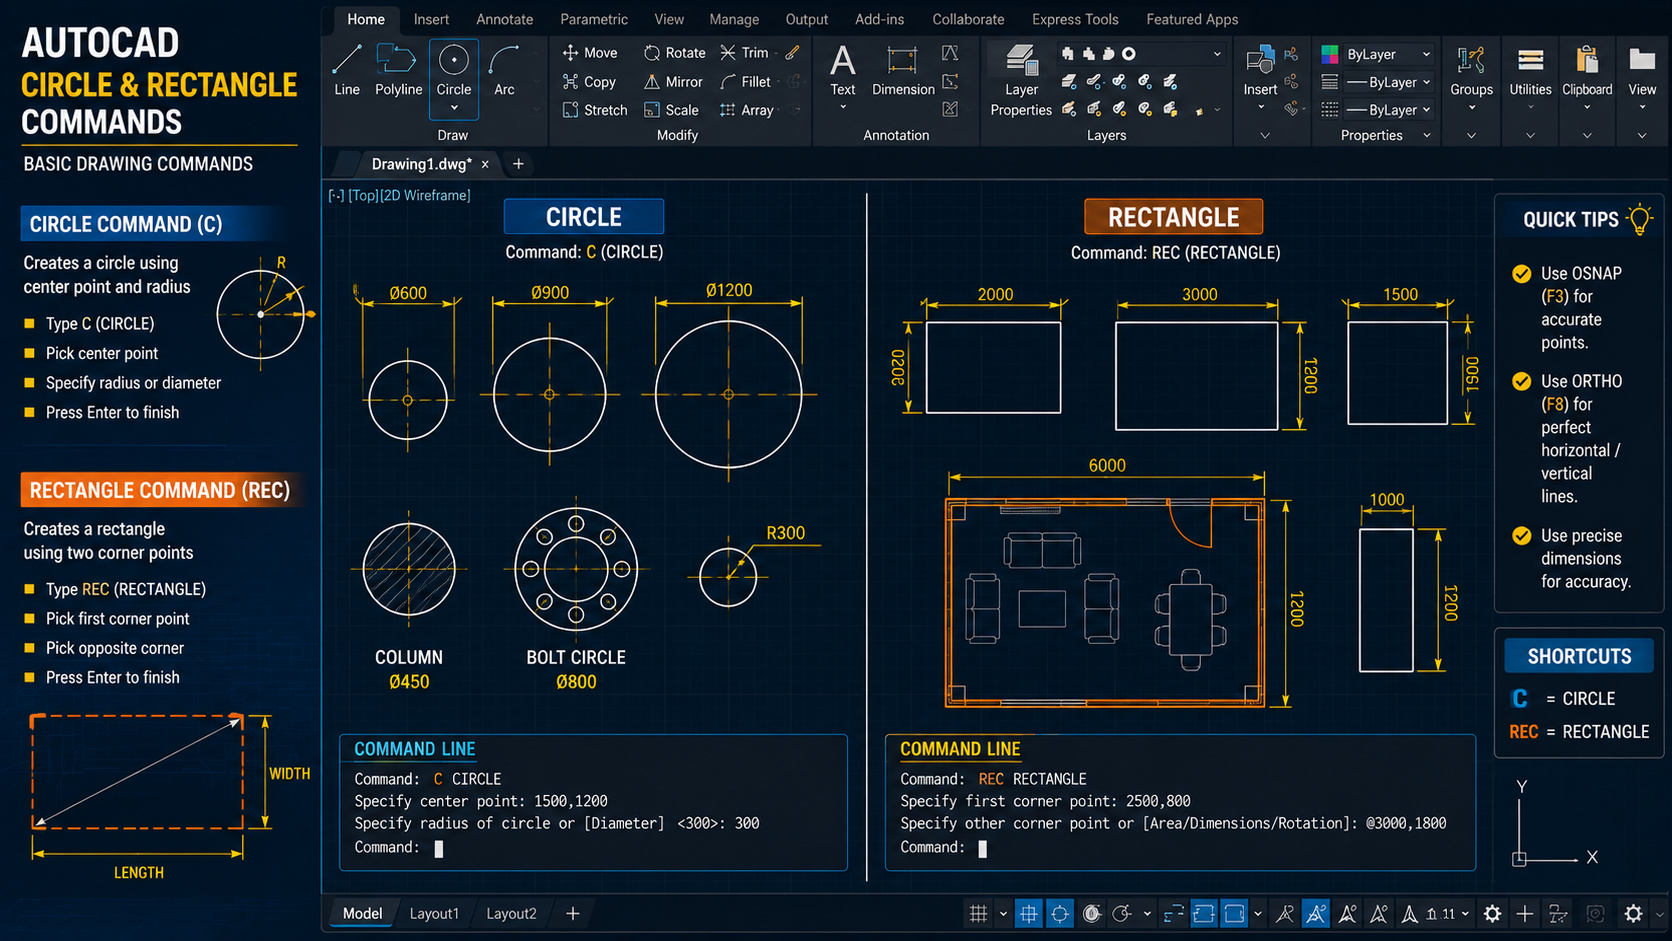
The CIRCLE command creates circles using various methods, such as Center-Radius or Center-Diameter.
Shortcut
- C + Enter
Basic Method
- Type C.
- Press Enter.
- Select the center point.
- Enter the radius.
- Press Enter.
- Common Uses
The Circle command is commonly used for:
- Columns
- Circular openings
- Structural details
- Plumbing fixtures
- Mechanical parts
- Architectural details
Example
For a circular column, you can specify the center point and enter the required radius to create the basic circular shape.
4. RECTANGLE Command — REC
The RECTANGLE command allows you to create rectangular shapes quickly and accurately.
Shortcut
- REC + Enter
How to create a Rectangular Shape
- Type REC.
- Press Enter.
- Select the first corner.
- Select the opposite corner.
- Press Esc.
You can also enter precise dimensions using the command line.
Where is the RECTANGLE command used?
It is useful for drawing:
- Rooms
- Doors
- Windows
- Furniture
- Columns
- Foundations
- Building layouts
- Tip for beginners
Use coordinates or dimensions when you need an exact rectangular size, rather than estimating the points with the mouse.
Example
For a circular column, you can specify the center point and enter the required radius to create the basic circular shape.
5. OFFSET Command — O
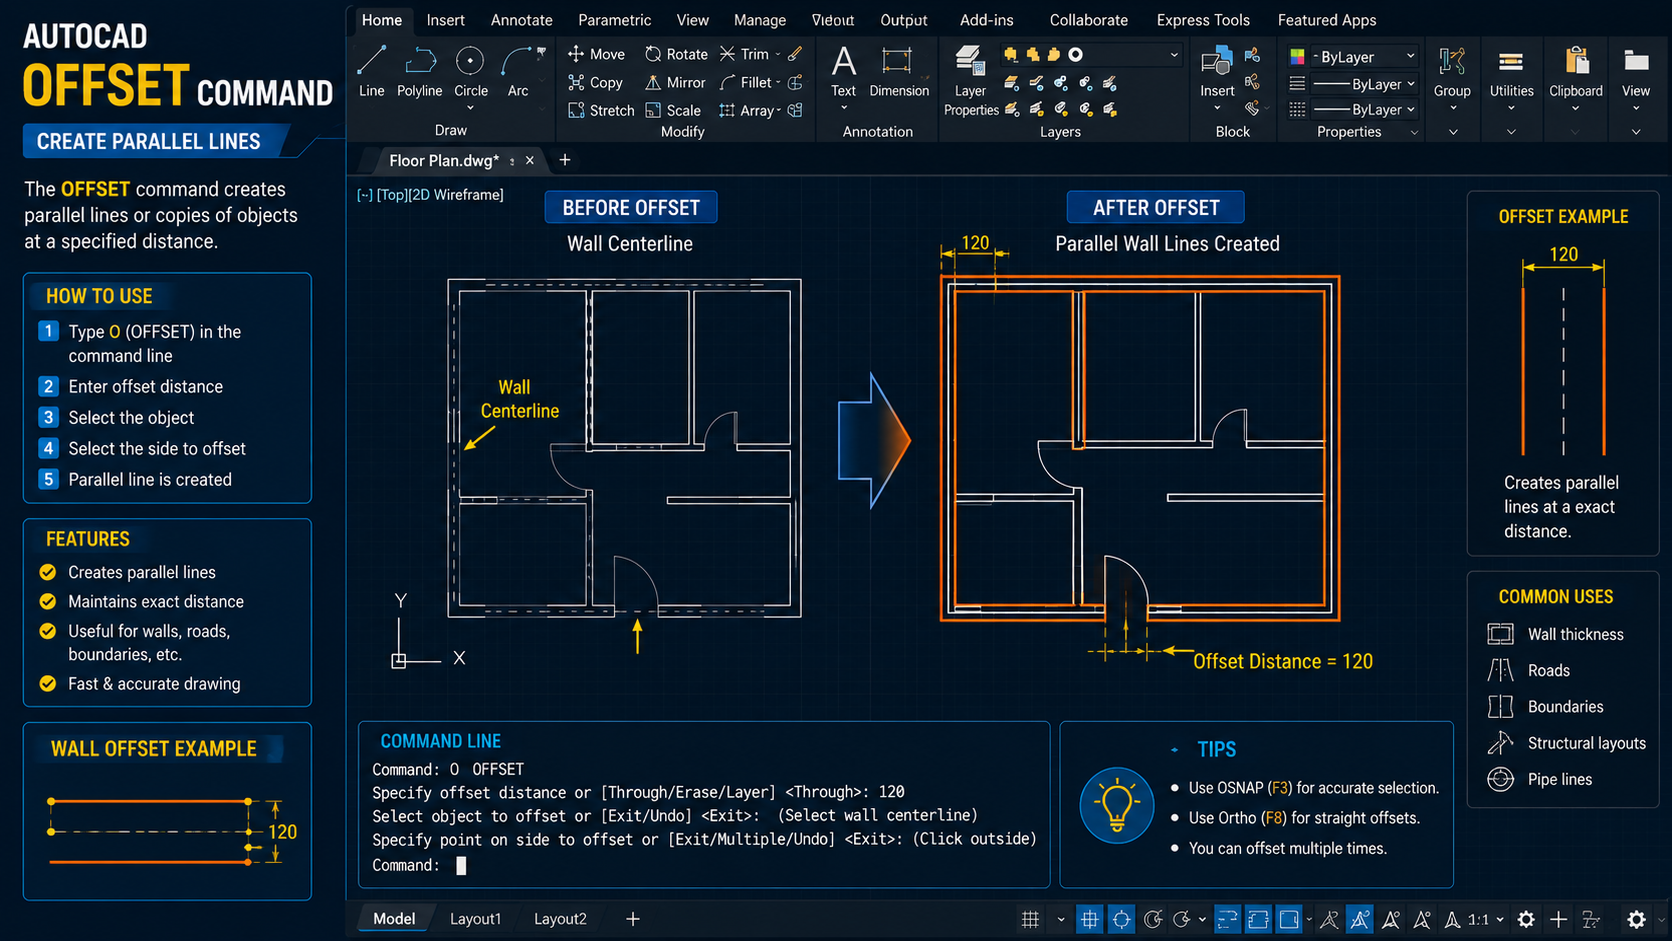
The OFFSET command creates a parallel or concentric copy of an existing object at a specified distance.
Shortcut
- O + Enter
How to create a Rectangular Shape
- Type REC.
- Press Enter.
- Select the first corner.
- Select the opposite corner.
- Press Esc.
You can also enter precise dimensions using the command line.
Example in a floor plan
Suppose you have a wall centerline and need to create the wall edges. You can offset the line by the required distance.
You can further improve your drafting skills by studying a staircase design with section B-B’.
OFFSET is particularly useful for:
- Wall thickness
- Road edges
- Structural layouts
- Parallel lines
- Creating floor plans
- Building boundaries
Why OFFSET is important
For architectural drafting, OFFSET is one of the most useful commands because many building elements require parallel geometry.
Once you understand basic commands, you can use them to create and modify an existing floor plan.
6. TRIM Command — TR
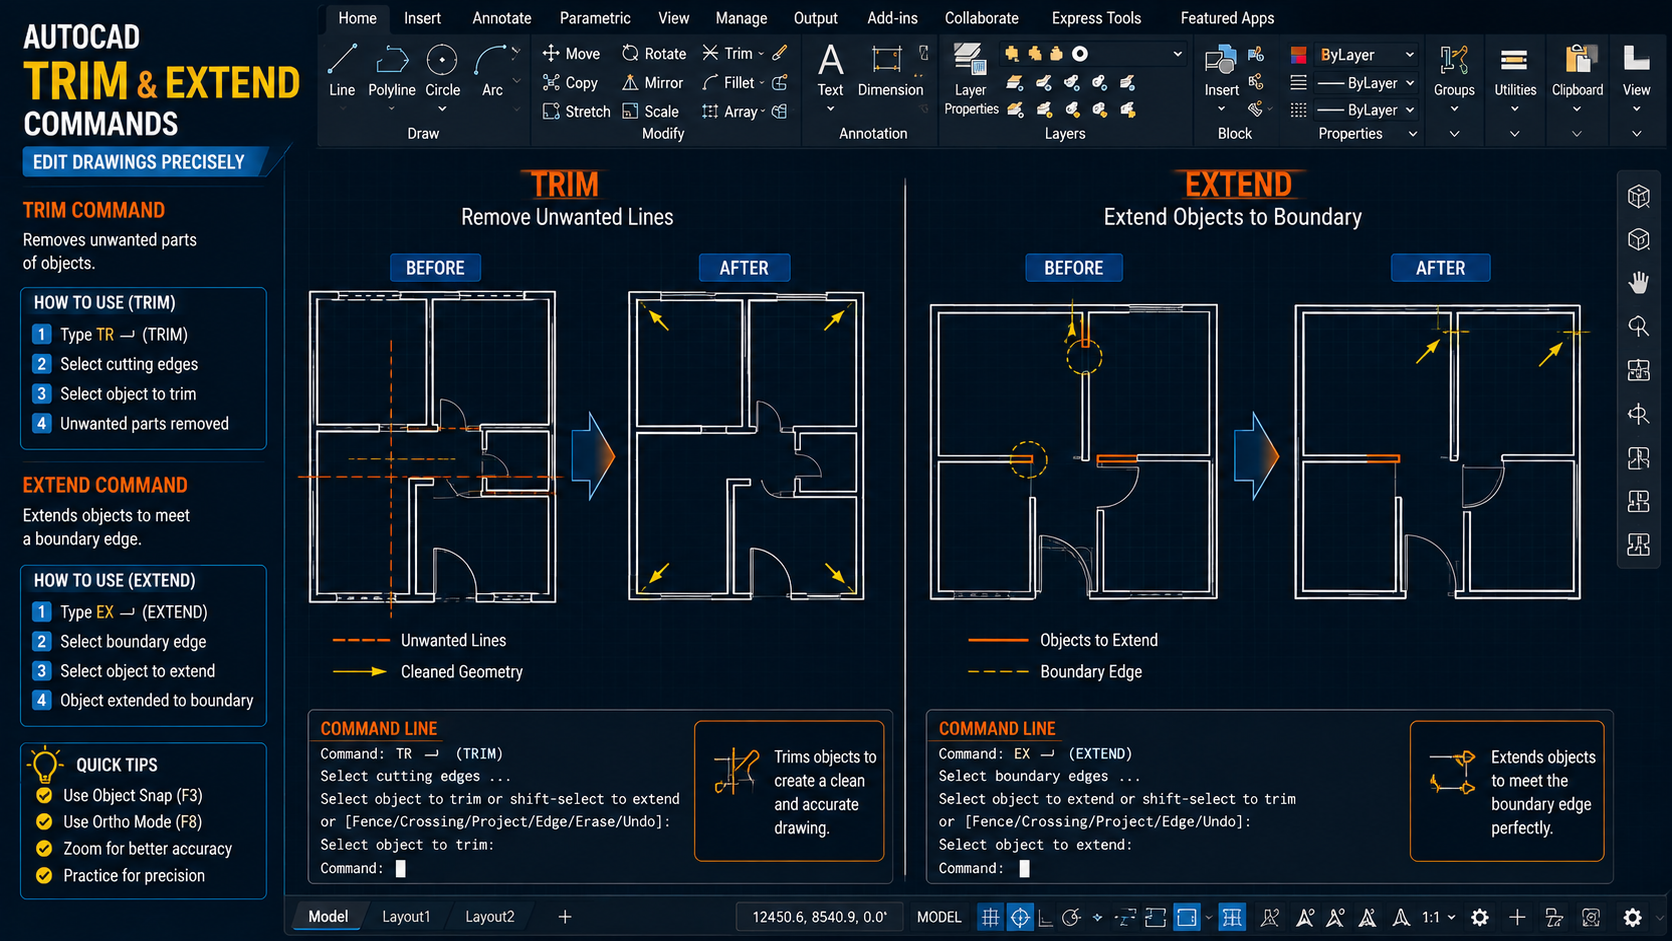
The TRIM command removes unwanted portions of objects.
Shortcut
- TR + Enter
Basic Workflow
- Type TR.
- Press Enter.
- Select cutting edges, if necessary.
- Select the part you want to remove.
Depending on your AutoCAD version and settings, you can also use a simplified workflow where objects are automatically treated as cutting edges.
Common Uses
TRIM is useful for:
- Cleaning up wall intersections
- Creating openings for doors
- Removing excess lines
- Editing floor plans
- Cleaning up structural drawings
- Tip for Beginners
Tip for Beginners
TRIM becomes even more powerful when used with precise object snaps and correctly constructed geometry.
7. EXTEND Command — EX
The EXTEND command lengthens an object until it reaches another object or a boundary.
Shortcut
- EX + Enter
How to use EXTEND
- Type EX.
- Press Enter.
- Select the boundary or use the appropriate selection workflow.
- Select the object you want to extend.
Where is EXTEND used?
It is commonly used for tasks such as:
- Connecting walls
- Extending structural lines
- Completing floor plans
- Aligning geometry
- Editing construction drawings
8. MOVE Command — M
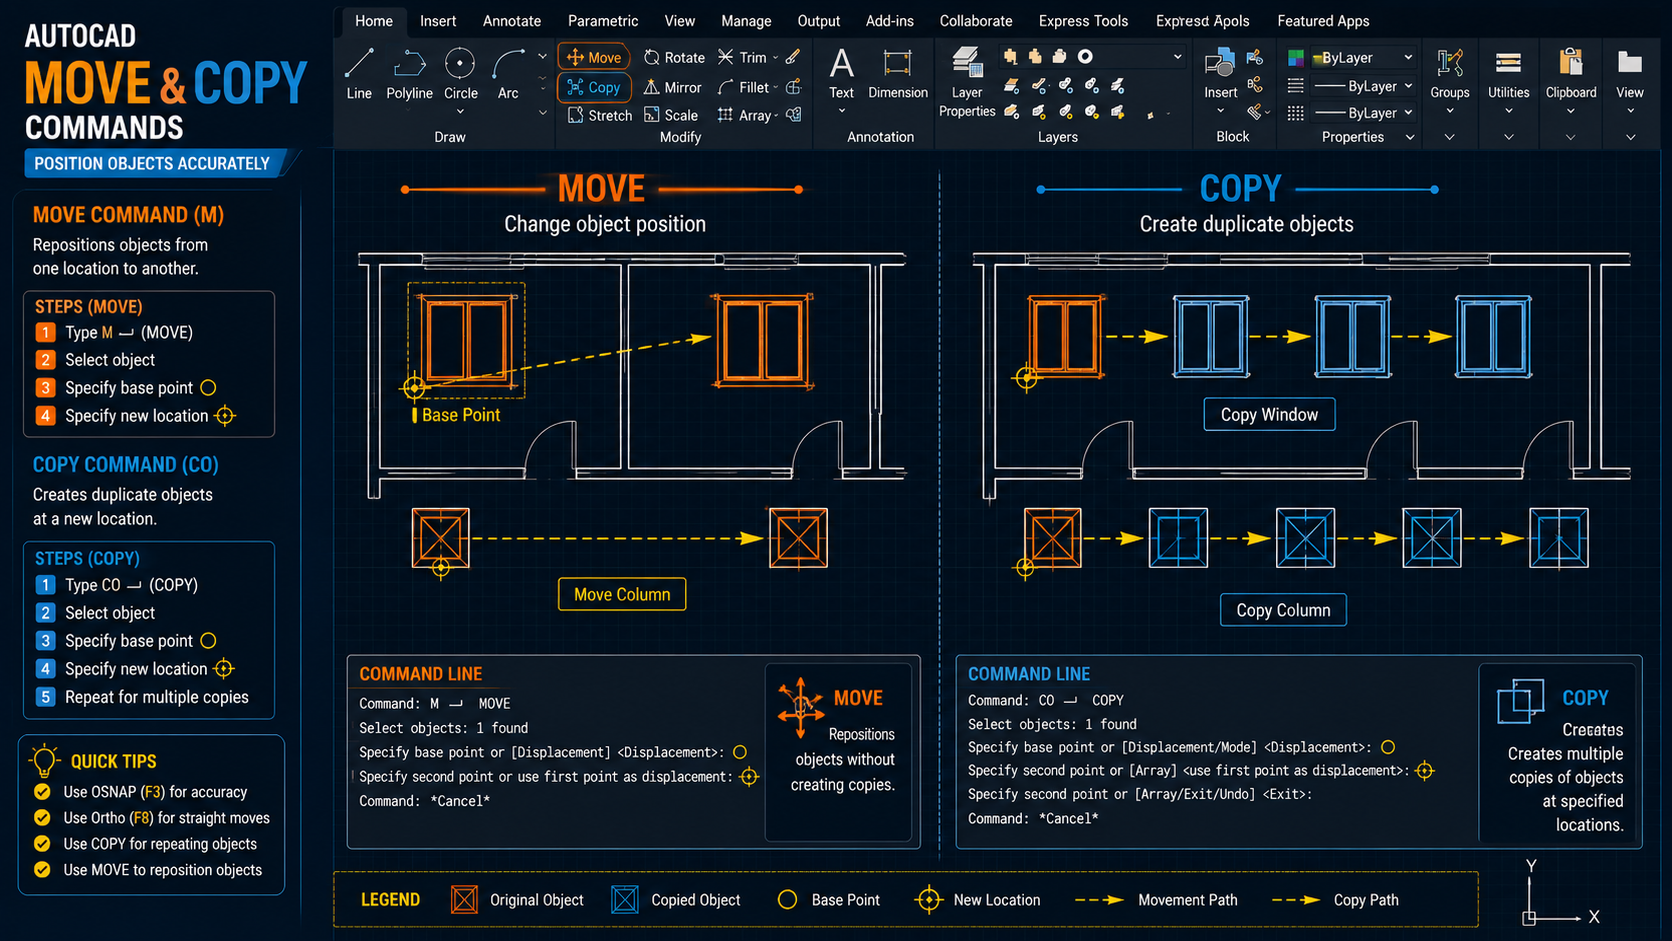
The MOVE command changes the location (position) of an object without altering its size or shape.
Shortcut
- M + Enter
How to use MOVE
- Type M.
- Press Enter.
- Select the object.
- Press Enter.
- Select a base point.
- Select the new
- location.
Common Uses
MOVE can be used to relocate items such as:
- Doors
- Windows
- Furniture
- Columns
- Dimensions
- Text
- Parts of a drawing
Tip for beginners
Use ‘Object Snap’ when moving objects that need to be precisely aligned with existing geometry.
For advanced options and command behavior, see the official TRIM and EXTEND documentation.
9. COPY Command — CO
The COPY command creates one or more duplicate copies of an existing object.
Shortcut
- CO + Enter
How to use COPY
- Type CO.
- Press Enter.
- Select the object.
- Press Enter.
- Select a base point.
- Select a destination point.
Where is COPY useful?
COPY is very useful when you need to create frequently used elements, such as:
- Columns
- Windows
- Doors
- Structural grids
- Furniture
- Staircase components
- Recurring architectural details
Tip for beginners
Instead of recreating identical objects, copy the original object and place the duplicate in the correct location.
10. ERASE Command — E
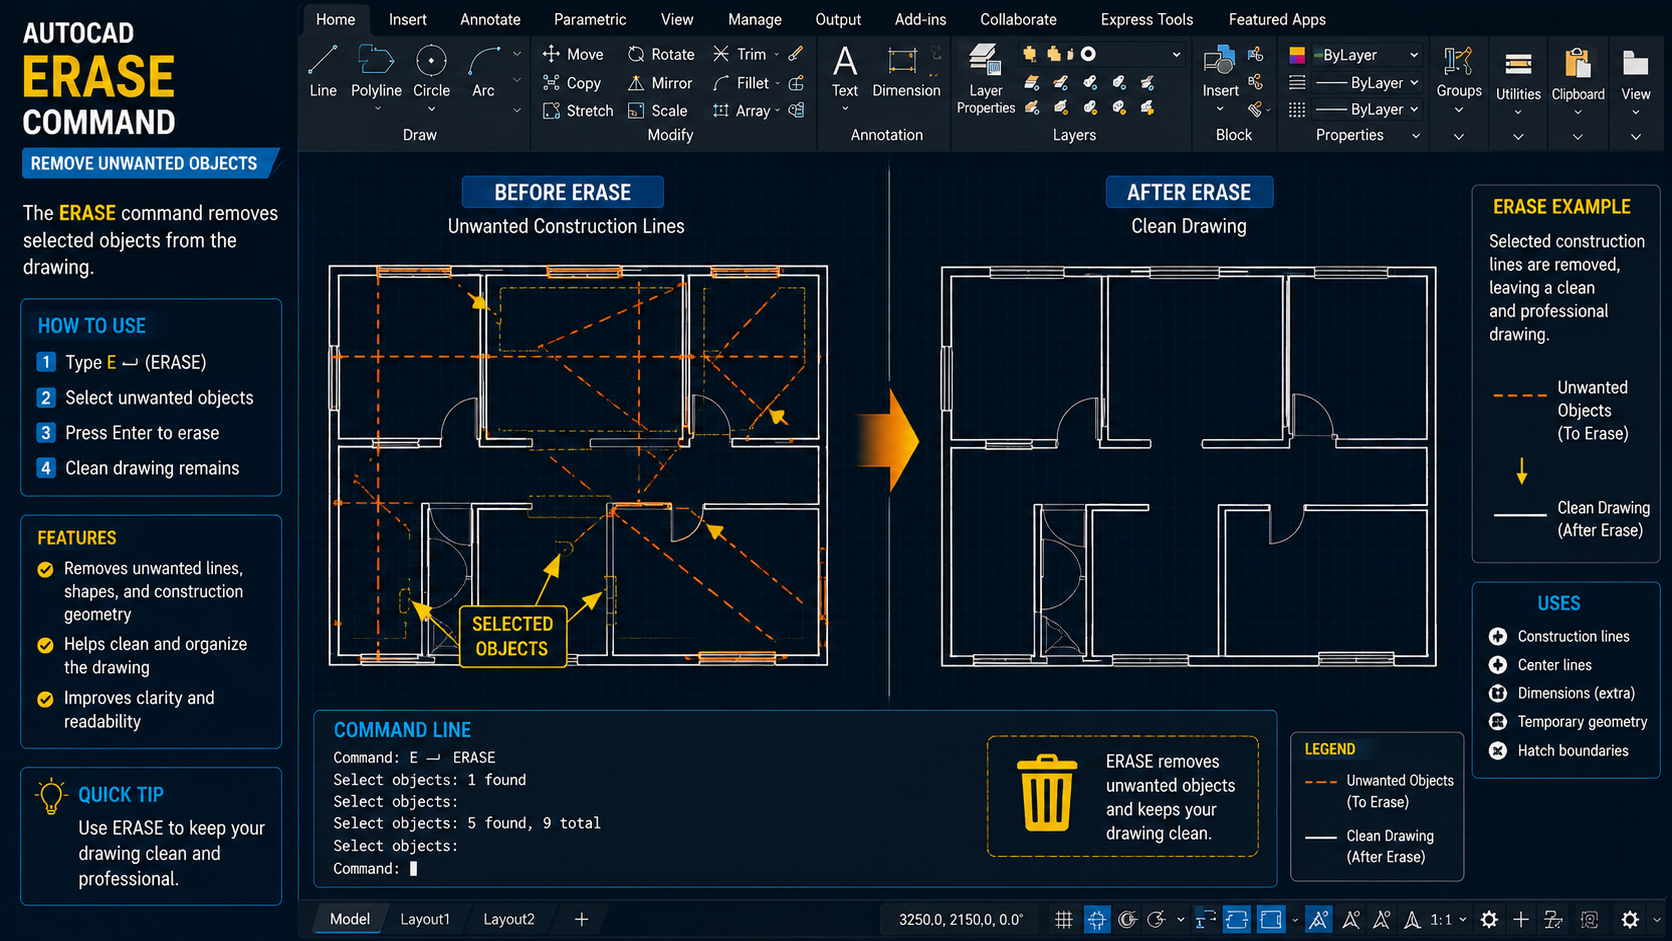
The ERASE command removes unwanted objects from the drawing.
Shortcut
- E + Enter
How to use ERASE
- Type E.
- Press Enter.
- Select the object or objects.
- Press Enter.
Common Uses
Use ERASE to remove:
- Construction line
- Incorrect geometry
- Duplicate objects
- Unwanted dimensions
- Temporary drawing elements
Important Tip
Before deleting essential geometry, ensure that you have selected the correct objects.
Some More Essential AutoCAD Commands for Beginners
HATCH — H
Used to fill enclosed areas with patterns or solid fills.
Useful for:
- Wall sections
- Concrete
- Brickwork
- Flooring
- Representing materials
DIM — DIM
Used to create dimensions and display measurements.
Useful for:
- Floor plans
- Structural drawings
- Working drawings
- Construction details
MATCHPROP — MA
Copies the properties of one object to another.
Helps maintain consistency in:
- Layers
- Colors
- Linetype
- Lineweights
- Object properties
FILLET — F
Creates a rounded connection between two objects.
Useful for:
- Detail drawings
- Mechanical shapes
- Architectural geometry
MIRROR — MI
- Creates a mirror image (copy) of selected objects.
- Particularly useful for symmetrical architectural layouts.
ROTATE — RO
Rotates selected objects around a specified base point.
Useful for:
- Doors
- Furniture
- Symbols
- Architectural components
How to Practice AutoCAD Commands
Simply memorizing shortcuts isn’t enough. Practice each command by creating a small drawing.
For more examples of plan and section drawings, explore this staircase design plan and section guide.
Practice Exercise 1: Simple Room
Create a basic room using these commands:
- LINE
- OFFSET
- TRIM
- EXTEND
- RECTANGLE
Practice Exercise 2: Door and Window
Use these commands:
- LINE
- OFFSET
- TRIM
- COPY
- MOVE
Practice Exercise 3: Column Layout
Use these commands:
- RECTANGLE
- COPY
- MOVE
- OFFSET
Practice Exercise 4: Simple Floor Plan
Use a combination of commands to create the following:
- Exterior walls
- Interior walls
- Doors
- Windows
- Columns
- Dimensions
With consistent practice, you will memorize the commands naturally and won’t need to rely on menus.
Beginners can also follow the AutoCAD Quick Start Guide for structured practice.
After learning these commands, practice them by creating detailed architectural and structural drawings such as an RCC staircase section design.
Tips for AutoCAD Beginners
Simply memorizing shortcuts isn’t enough. Practice each command by creating a small drawing.
1. Use Object Snap
Object Snap helps you accurately select geometric points such as endpoints, midpoints, centers, and intersections.
2. Learn about Ortho Mode
You should know that pressing F8 toggles Ortho Mode on or off. It assists you in creating horizontal and vertical lines.
3. Use Layers
Always organize your drawing into appropriate layers based on elements like walls, dimensions, text, furniture, structural components, and other parts.
4. Use Keyboard Shortcuts
Typing commands directly can significantly improve your drafting efficiency.
5. Use Precise Dimensions
Avoid estimating by eye when creating drawings. Instead, use coordinates, dimensions, snaps, and exact distances.
6. Save Your Drawing Regularly
Always use proper file names and save necessary versions of your drawing to minimize the risk of losing your work.
Conclusion
For architects and engineers, learning and using the right AutoCAD commands is the first step toward gaining speed and confidence in CAD drafting. Commands such as LINE, POLYLINE, CIRCLE, RECTANGLE, OFFSET, TRIM, EXTEND, MOVE, COPY, and ERASE establish a solid foundation for beginners.
Once you become comfortable with these commands, you can move on to more advanced tools like HATCH, DIM, MIRROR, ROTATE, FILLET, MATCHPROP, blocks, layers, and annotation tools.
For architecture and civil engineering students, consistent practice with actual floor plans and construction drawings is one of the best ways to develop practical AutoCAD skills.
Once you are comfortable with AutoCAD commands, you can learn how building drawings are prepared for building plan approval.
Frequently Asked Questions
Which AutoCAD commands should beginners learn first?
Beginners should start with LINE, POLYLINE, CIRCLE, RECTANGLE, OFFSET, TRIM, EXTEND, MOVE, COPY, and ERASE.
What is the most important AutoCAD command?
There is no single most important command, but LINE, OFFSET, TRIM, COPY, and MOVE are among the most frequently used commands in 2D drafting.
How can I learn AutoCAD faster?
Practice commands by creating small architectural drawings rather than only memorizing shortcuts. Start with simple rooms, doors, windows, columns, and floor plans.
Is AutoCAD difficult for beginners?
AutoCAD may seem complicated initially, but learning commonly used commands and practicing basic drawings can make the software much easier to understand.
Can these commands be used for civil engineering drawings?
Yes. These commands are widely useful for 2D architectural, civil engineering, structural, and construction drawings.