

Introduction
AutoCAD is one of the most widely used Computer-Aided Design (CAD) software applications for creating precise 2D drawings and 3D models. It is commonly used by architects, civil engineers, structural engineers, interior designers, mechanical engineers, students, and construction professionals.
For most beginners, learning AutoCAD can seem daunting due to the vast array of tools, commands, panels, and settings within the software. However, starting by understanding the basic commands and the drawing workflow makes the process much easier.
We have prepared this AutoCAD basics guide for students, engineers, and architects who are just starting to learn the software. It covers essential concepts you need to know, such as the AutoCAD interface, drawing commands, modification tools, layers, dimensions, blocks, object snaps, and printing.
Beginners who want to explore official learning resources can also follow these official AutoCAD tutorials for additional guidance.
What is AutoCAD?
Let us first understand in detail what AutoCAD is. AutoCAD is computer-aided design software used to create precise technical drawings and design documentation.
Nowadays, it is widely used to simplify tasks related to engineering drawings; instead of drawing everything by hand, AutoCAD enables users to create lines, circles, walls, columns, doors, windows, dimensions, annotations, and other design elements with great precision.
AutoCAD is widely used for:
- Architectural floor plans
- Building drawings
- Structural drawings
- Civil engineering drawings
- Electrical layouts
- Plumbing drawings
- Interior design drawings
- Site plans
- Construction details
- Mechanical drawings
For architecture and civil engineering students, learning AutoCAD fundamentals can be an important first step toward creating professional technical drawings.
Why Should Beginners Learn AutoCAD?
There are several practical benefits to learning AutoCAD.
1. Precise Drafting
AutoCAD allows you to create drawings with precise dimensions and coordinates.
2. Faster Design
Repetitive drafting tasks can be completed very quickly using commands, blocks, and templates.
3. Easy Editing
Objects can be moved, copied, stretched, trimmed, extended, or modified without having to recreate the entire design.
4. Professional Documentation
AutoCAD helps create organized construction drawings using layers, dimensions, text, and annotations.
5. Industry Application
AutoCAD skills are valuable in architecture, civil engineering, construction, interior design, and many other technical fields.
Understanding the AutoCAD Interface
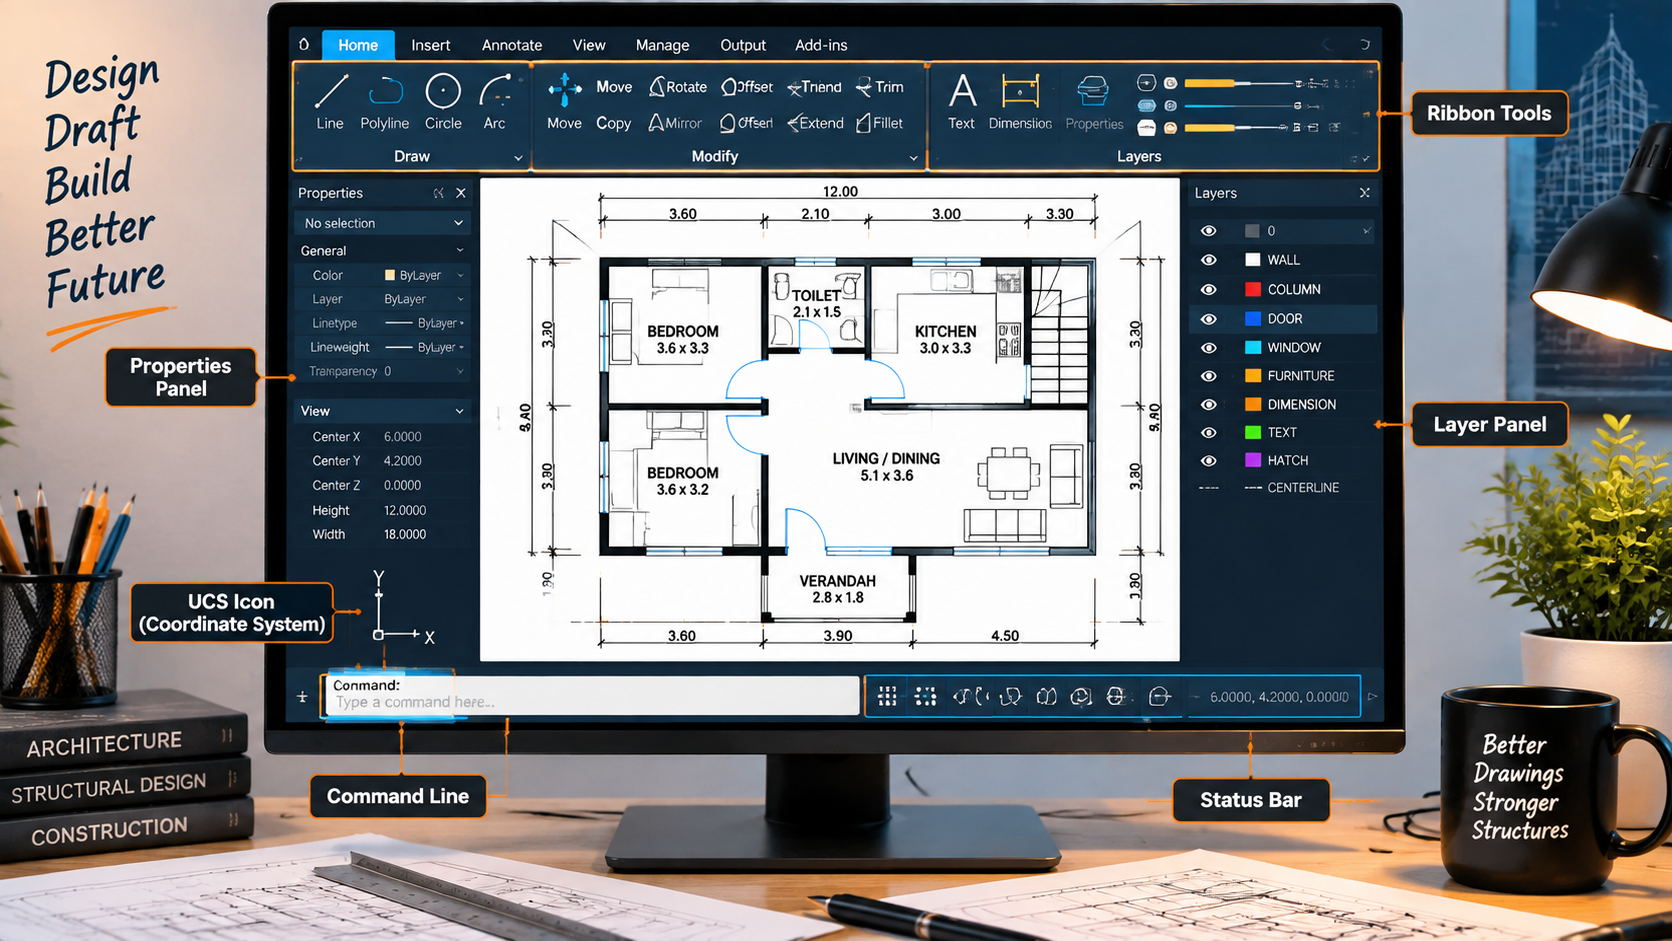
Before starting your first drawing, you should always understand the basic components of the AutoCAD interface.
1. Application Menu
The Application Menu provides options for creating, opening, saving, and exporting drawings.
2. Ribbon
The Ribbon contains frequently used drawing and editing tools, organized into various tabs and panels.
Common tabs include:
- Home
- Insert
- Annotate
- View
- Manage
- Output
3. Command Line
The command line is one of the most important parts of AutoCAD.
You can type commands directly instead of manually searching for tools.
For example:
L → Enter
This starts the Line command.
4. Drawing Area
This is the large central area where you create and edit your drawings.
5. Status Bar
The status bar contains useful drafting-related settings, such as:
- Grid
- Snap
- Ortho
- Polar Tracking
- Object Snap
- Dynamic Input
6. UCS Icon
The User Coordinate System (UCS) icon helps you understand the orientation of your drawing and the coordinate system.
Basic AutoCAD Drawing Commands
Beginners should start by learning these fundamental drawing commands, as they are the most frequently used.
After learning the basic commands, beginners can use the AutoCAD Quick Start Guide to practice additional drafting tools and workflows.
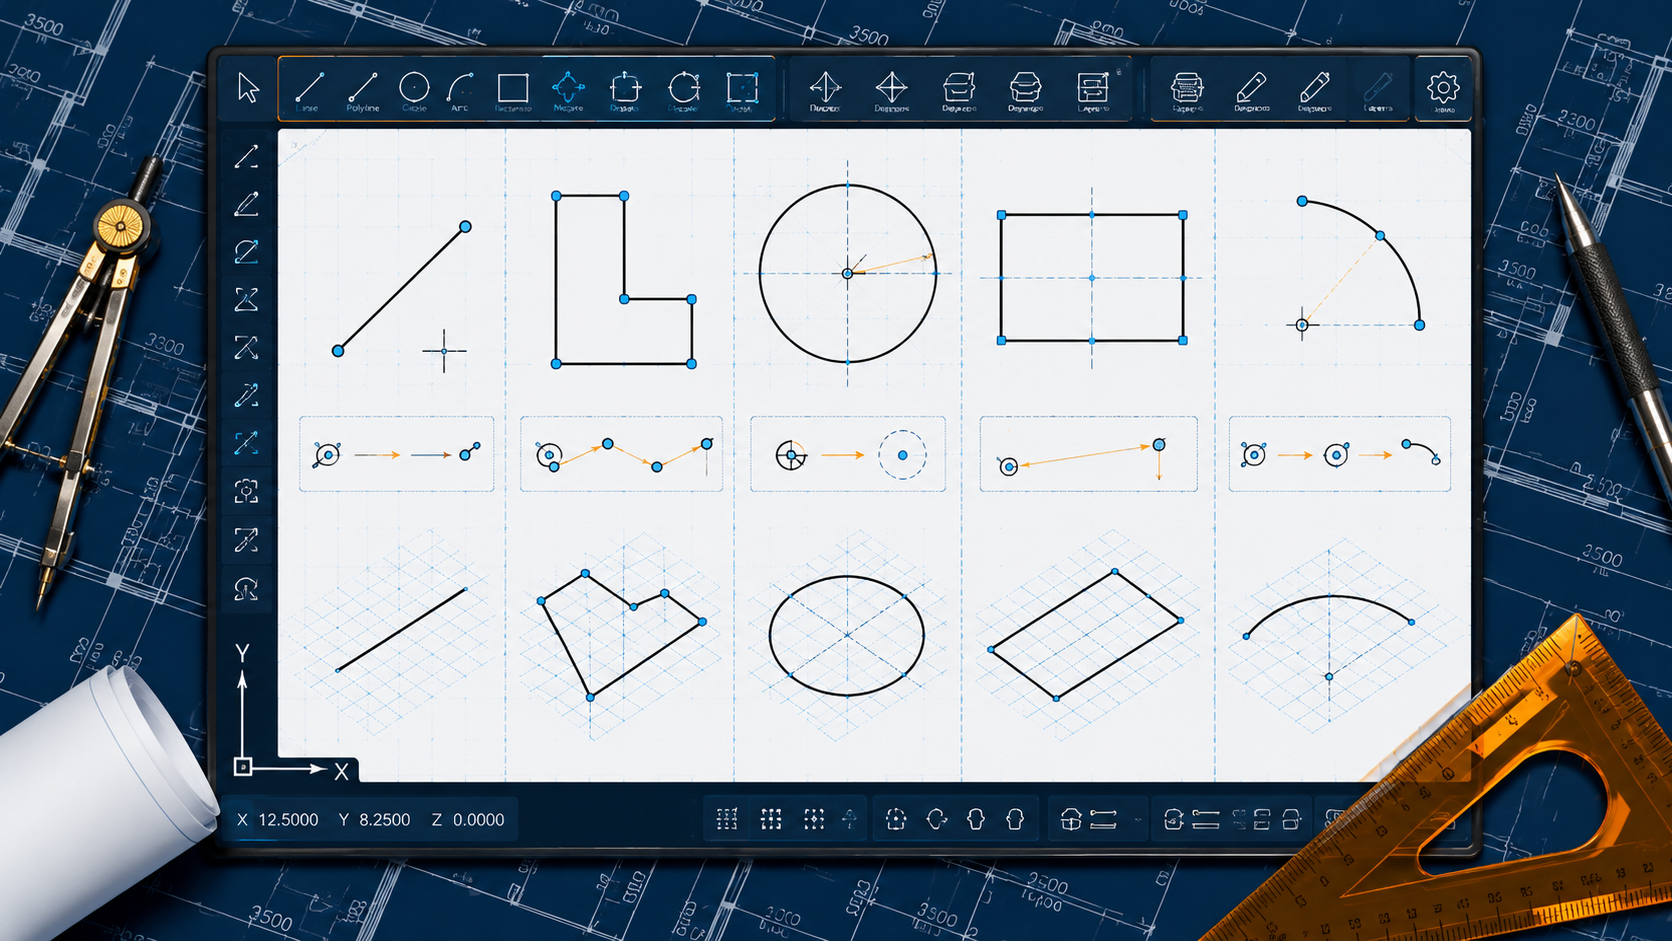
1. LINE
The Line command is used to create straight lines.
Shortcut: L
Basic workflow:
- Type L
- Press Enter
- Select the starting point
- Select the endpoint
- Press Enter to finish
Lines are commonly used for walls, boundaries, structural elements, and construction details.
2. Polyline
The Polyline command treats connected line segments as a single object.
Shortcut: PL
Unlike individual lines, a polyline can consist of multiple connected segments.
Polylines are useful for:
- Site boundaries
- Closed shapes
- Wall outlines
- Roads
- Property
- boundaries
3. CIRCLE
The Circle command creates a circular shape (circular geometry).
Shortcut: C
A common way to use it is:
- Start the Circle command.
- Select the center point.
- Enter the radius.
The Circle command is commonly used for columns, pipes, symbols, and mechanical parts.
4. RECTANGLE
The Rectangle command creates a rectangular shape.
Shortcut: REC
It is particularly useful for creating:
- Rooms
- Columns
- Doors
- Windows
- Furniture outlines
- Building boundaries
5. ARC
The Arc command creates a curved shape (curved geometry).
Shortcut: A
Arcs are useful for architectural details, curved walls, doors, road layouts, and other curved elements.
Essential Modify Commands in AutoCAD
In AutoCAD, simply drawing objects is not enough; you also need to know how to modify them. Here are some of the basic modify commands:
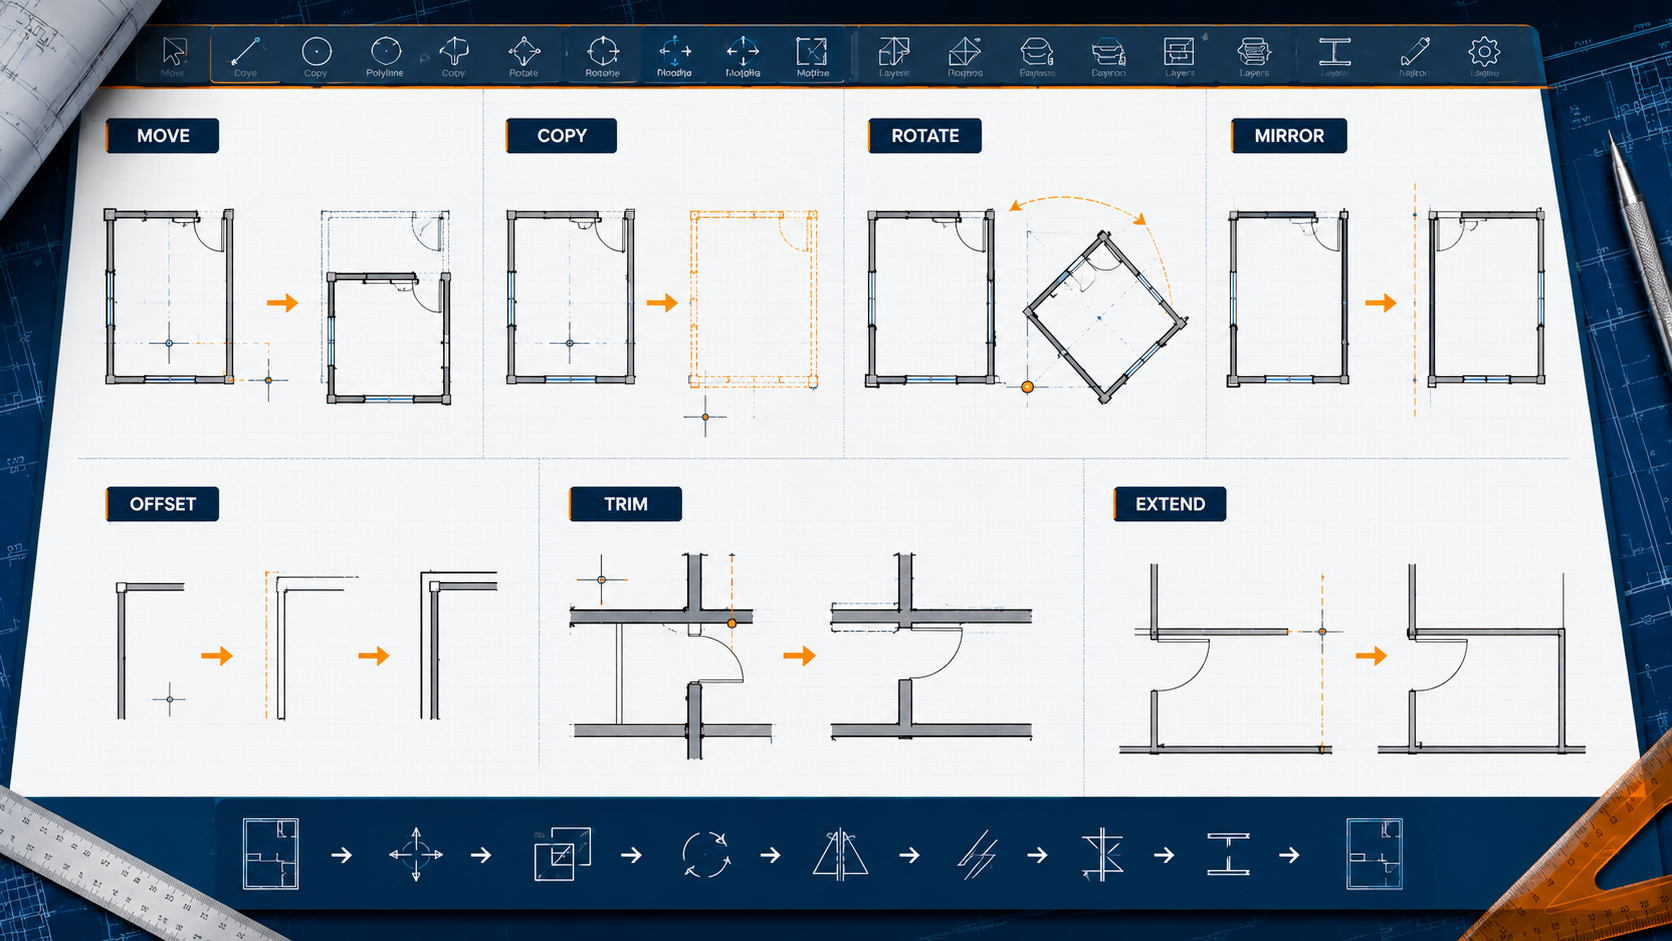
1. MOVE
Shortcut: M
Moves an object from one location to another.
Example:
Select column → Select base point → Select new location.
2. COPY
Shortcut: CO
Creates one or more copies of an existing object.
This is very useful when you need multiple identical columns, windows, or other elements
3. ROTATE
Shortcut: RO
Rotates an object around a selected base point.
4. Mirror
Shortcut: MI
Creates a mirror copy of selected objects.
Mirror is useful for symmetrical floor plans and architectural layouts.
5. Offset
Shortcut: O
Creates a parallel or concentric copy of an object at a specified distance.
For architectural drawings, Offset is one of the most useful commands for creating wall thicknesses.
For example:
A wall’s centerline can be offset by a specific distance to create the wall’s boundaries.
6. Trim
Shortcut: TR
Removes unwanted parts of objects.
Trim is frequently used when cleaning up floor plans and construction drawings.
7. Extend
Shortcut: EX
Extends an object until it reaches another selected boundary.
8. FILLET
Shortcut: F
Joins two objects with a rounded corner.
9. STRETCH
Shortcut: S
Changes the shape or size of selected objects while maintaining proper connections.
10. ERASE
Shortcut: E
Removes selected objects from the drawing.
AutoCAD Coordinate Systems
Understanding coordinates is essential for accurate drafting.
AutoCAD uses coordinate systems to determine the precise location of objects.
Basic coordinate types include:
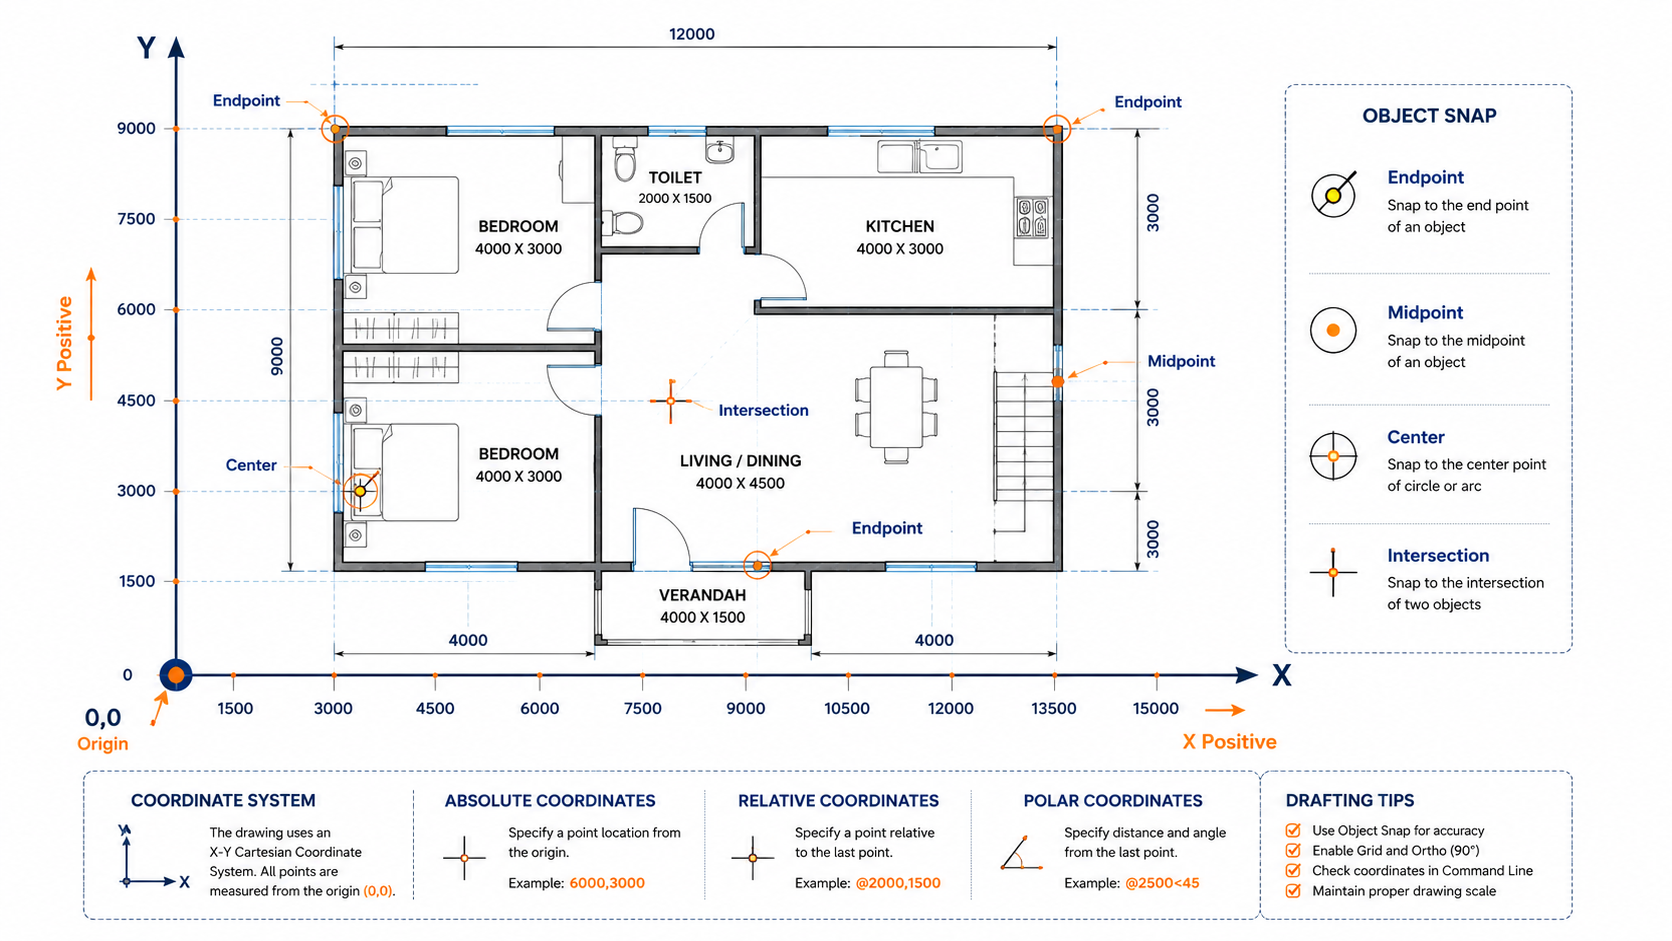
1. Absolute Coordinates
Absolute coordinates are measured from the origin point (0,0).
Example:
100,50
This means X = 100 and Y = 50.
2. Relative Coordinates
Relative coordinates are measured from the previous point.
Example:
@100,50
This means moving 100 units in the X direction and 50 units in the Y direction from the previous point.
3. Polar Coordinates
Polar coordinates specify distance and angle.
Example:
@100<45
This means a distance of 100 units at an angle of 45 degrees.
Object Snap in AutoCAD
Object Snap, commonly referred to as OSNAP, helps you select precise geometric points.
Some key Object Snap options include:
- Endpoint
- Midpoint
- Center
- Intersection
- Perpendicular
- Tangent
- Quadrant
- Nearest
Object Snap is crucial for creating precise technical drawings.
For example, when joining two walls, the Endpoint Snap helps ensure that the lines meet at the exact right location.
1. Ortho Mode
Ortho Mode restricts cursor movement to horizontal and vertical directions.
Shortcut: F8
It is useful for creating:
- Horizontal walls
- Vertical walls
- Structural grids
- Rectangular layouts
- Building plans
2. Polar Tracking
Polar Tracking helps in drawing lines at predefined angles.
Shortcut: F10
Common angle settings include:
- 90°
- 45°
- 30°
- 60°
It is useful for creating architectural or engineering elements involving angles.
Layers in AutoCAD
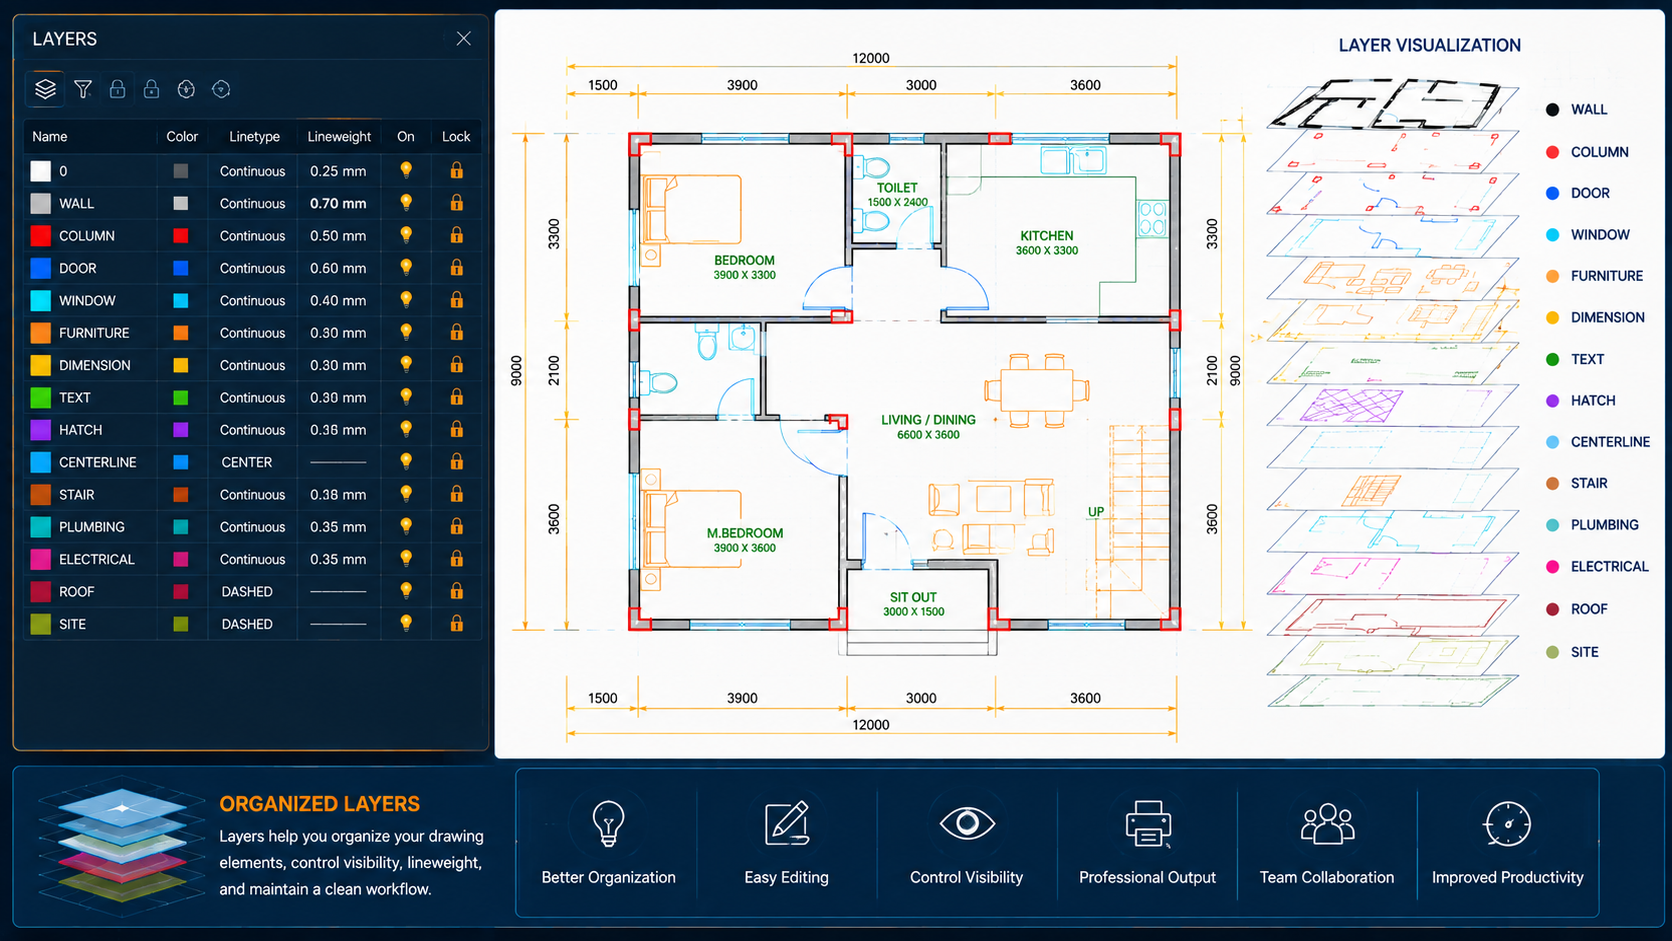
Layers are essential for creating organized drawings.
Instead of keeping every object on one layer, different elements should be placed on appropriate layers.
For example:
layers
- WALL
- COLUMN
- DOOR
- WINDOW
- Dimensions
- text
- ELECTRICAL
- FURNITURE
- CENTERLINE
Layers can control:
- color
- line type
- Lineweight
- Visibility
- Object organization
A properly organized layer system makes drawings easier to edit and print.
Understanding Units in AutoCAD
Before starting a project, you should decide which units you will use for the drawing.
The commonly used units are:
- Millimeters
- Centimeters
- Meters
- Inches
- Feet
In India, dimensions in architectural and civil engineering drawings are typically represented in millimeters or meters, depending on the project and drawing standards.
Use the UNITS command to view or set the drawing units.
Text and Annotation
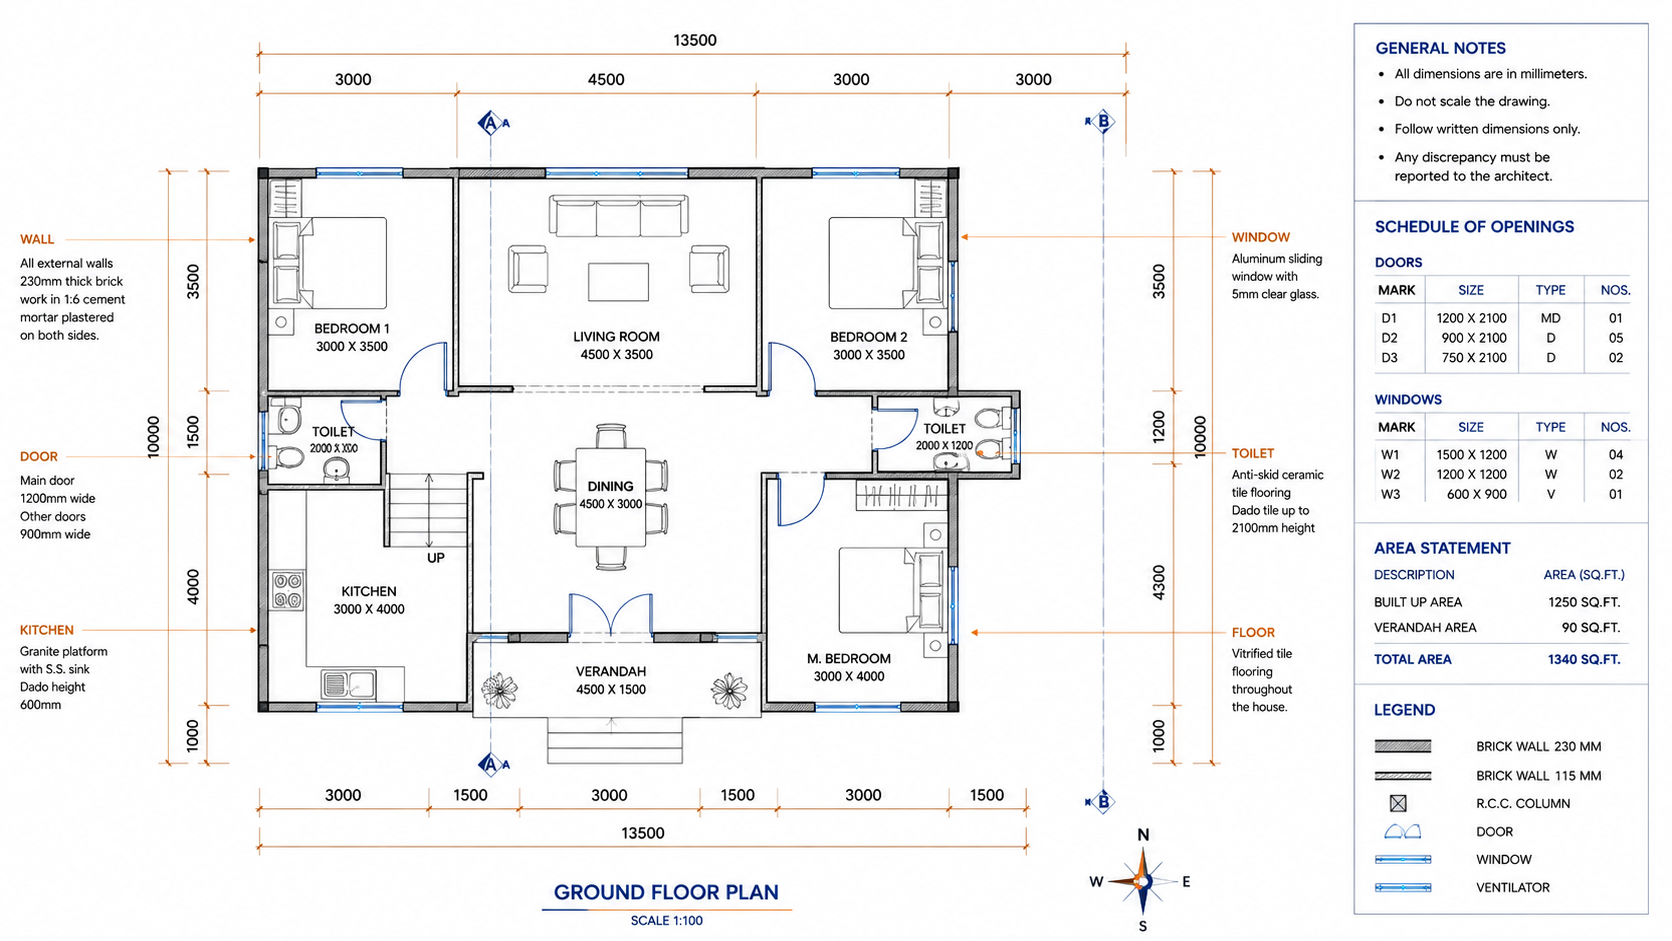
AutoCAD allows you to add notes, labels, room names, specifications, and other information.
Common commands include:
- TEXT
- MTEXT
- LEADER
- MLEADER
For example, an architectural floor plan might include labels such as:
- Living Room
- Bedroom
- Kitchen
- Toilet
- Stairs
- Balcony
Ensure the text is legible and use a consistent text style throughout the drawing.
Blocks in AutoCAD
A block is a group of objects that can be reused.
Blocks are very useful when the same symbol or component is needed multiple times.
Examples:
- Doors
- Windows
- Furniture
- Electrical symbols
- Plumbing fixtures
- Trees
- Vehicles
- Structural symbols
Using blocks can significantly reduce repetitive drafting work.
Hatch Command
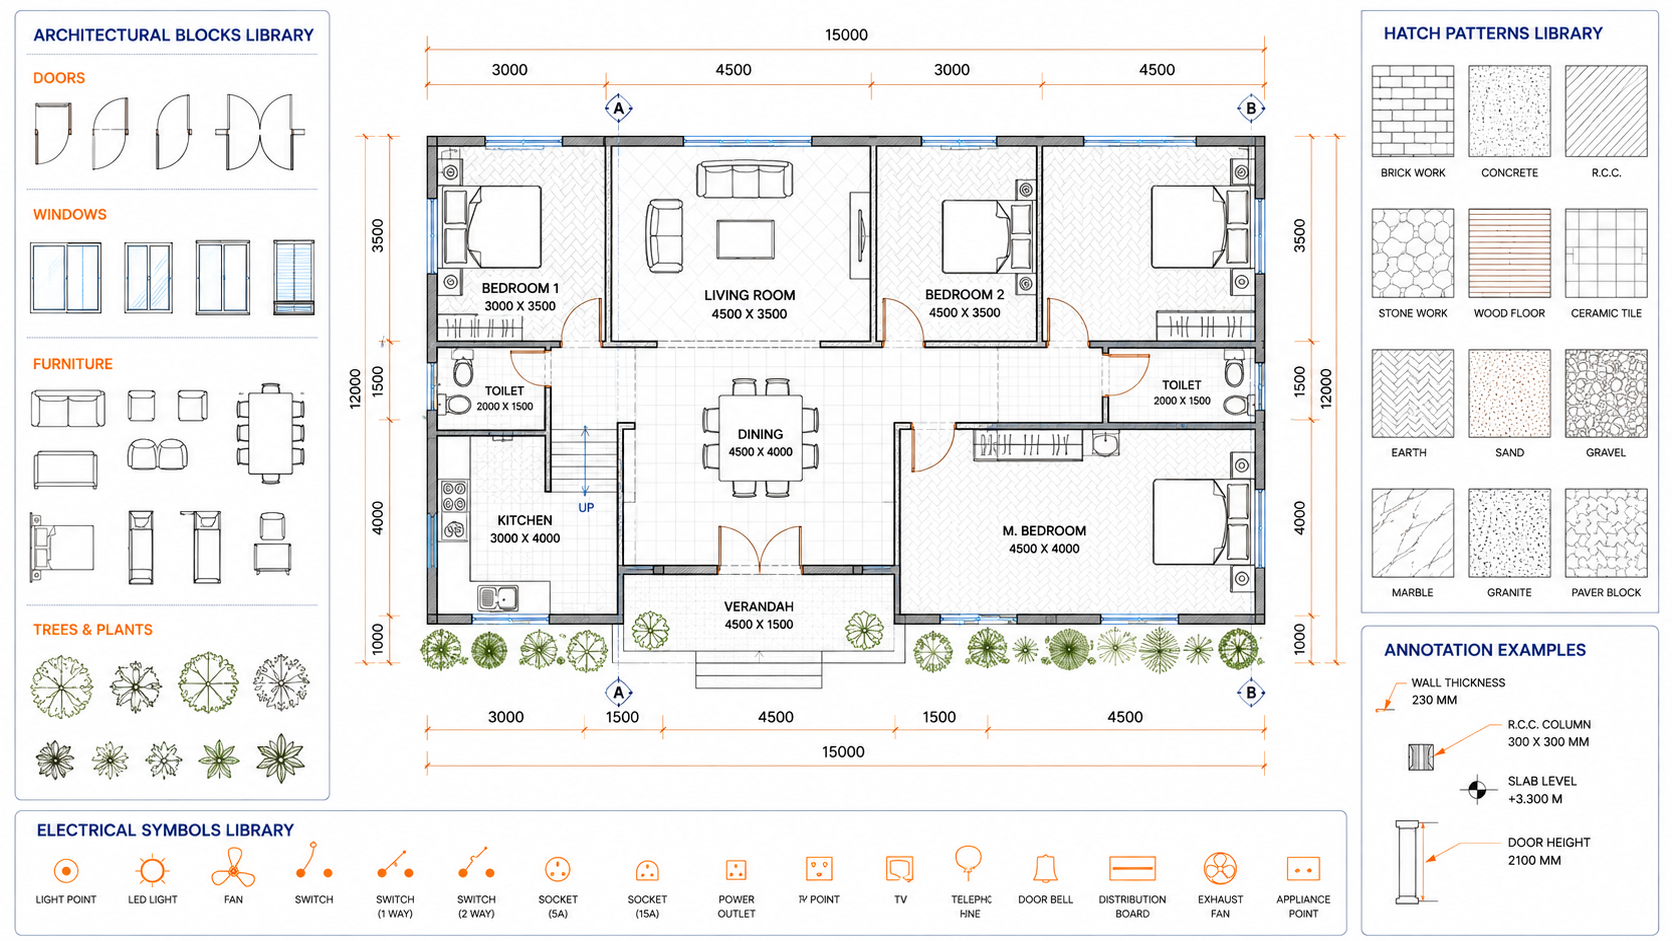
The Hatch command fills a closed area with a pattern.
Shortcut: H
Hatching is commonly used to represent:
- Concrete
- Brickwork
- Soil
- Flooring
- Sectioned materials
- Various
- construction
- elements
Using the correct hatch pattern makes technical drawings easier to understand.
Layers vs. Blocks in AutoCAD
Beginners sometimes get confused between layers and blocks.
Layers
Layers organize drawing objects and control properties such as visibility, color, linetype, and lineweight.
Blocks
Blocks combine multiple objects into a single component that can be reused.
For example:
A door symbol can be created as a block and placed on the ‘DOOR’ layer.
Model Space and Paper Space
AutoCAD has two important working environments.
Understanding the difference between Model Space and Paper Space is essential when preparing drawings for professional printing. You can also refer to the official Model Space and Paper Space documentation for more details.
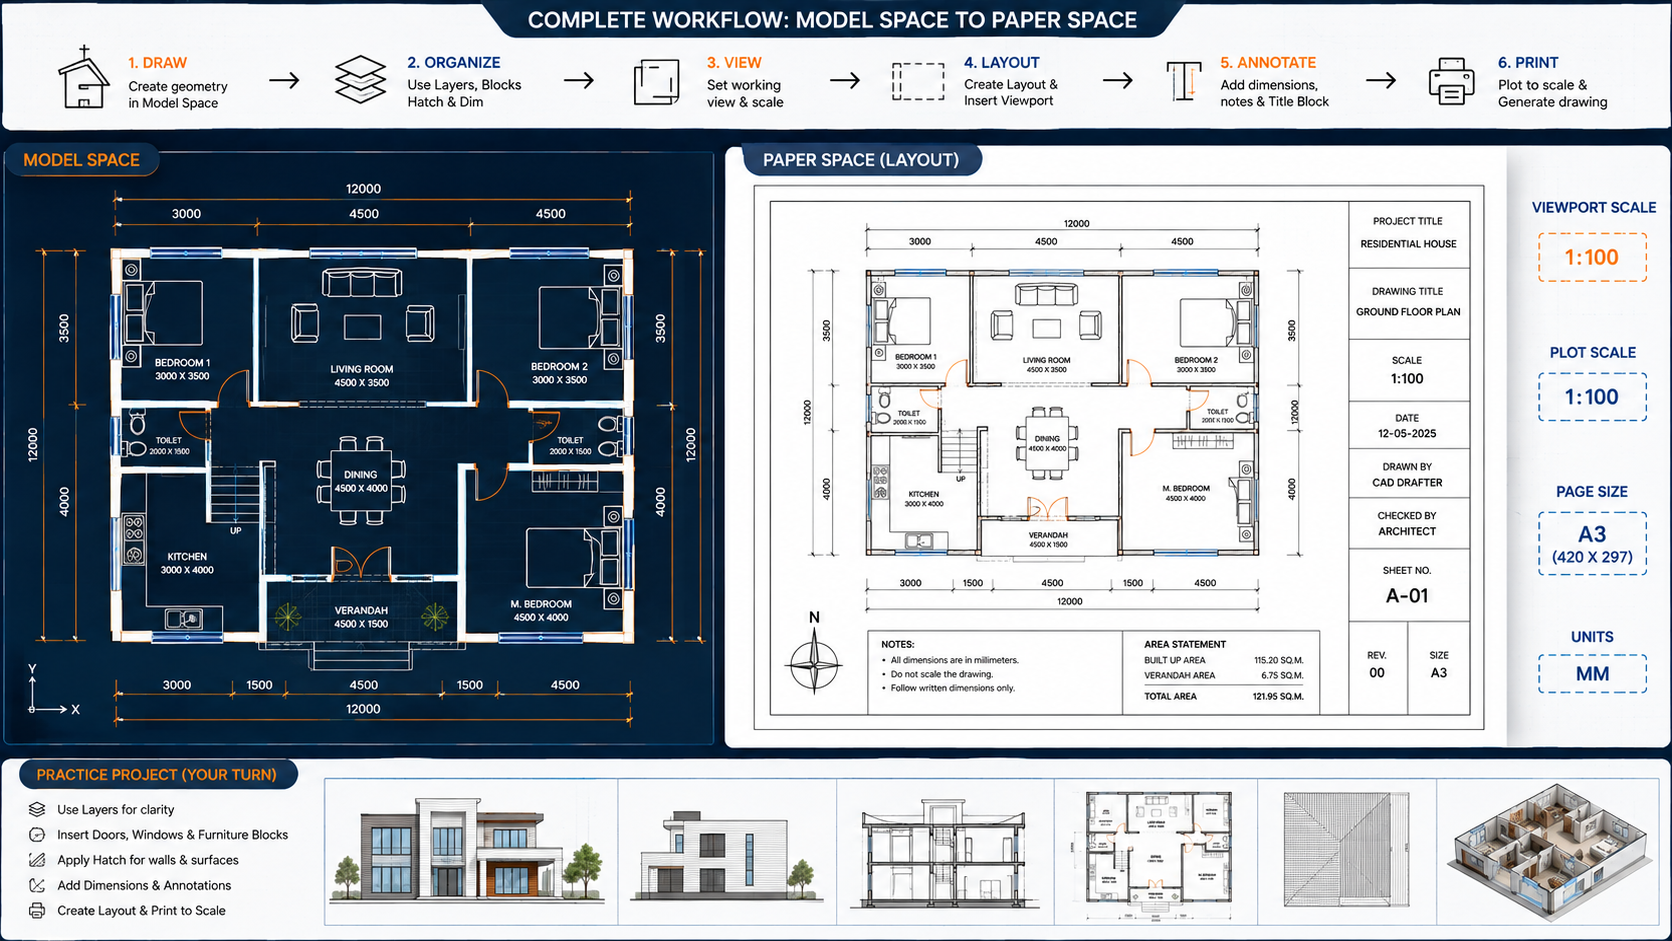
a. Model Space
Model Space is where you normally create your drawing at its actual size.
For example, if a wall is 3000 mm long, you can draw it at 3000 units when working in millimeters.
b. Paper Space/Layout
Paper Space is used to prepare the drawing for printing or plotting.
It allows you to create:
- Drawing sheets
- Viewports
- Titles
- Scale settings
- Sheet layouts
Understanding Drawing Scales
Scale is crucial when preparing drawings for printing.
Commonly used architectural scales include:
- 1:50
- 1:100
- 1:200
Choosing the right scale depends on the type of drawing and the sheet size.
For example:
A larger scale might be required for detailed views of a room or a specific construction element, whereas a smaller scale could be used for a full site plan.
Understanding Drawing Scales
After completing the drawing, you may need to print or export it.
The general workflow is as follows:
- Complete the drawing in Model Space.
- Open a layout.
- Create a viewport.
- Set the required drawing scale.
- Add the title block and annotations.
- Check lineweights (line thickness).
- Preview the drawing.
- Select the appropriate paper size.
- Plot or export the drawing.
Common output formats include:
- DWG
- DWF
AutoCAD Commands Every Beginner Should Learn
If you are completely new to AutoCAD, focus on these commands first:
- LINE
- POLYLINE
- CIRCLE
- RECTANGLE
- OFFSET
- TRIM
- EXTEND
- MOVE
- COPY
- ROTATE
- MIRROR
- FILLET
- STRETCH
- HATCH
- DIM
- MTEXT
- BLOCK
- LAYER
- MATCHPROP
- PLOT
Once you understand these commands, you can start creating practical drawings.
How to Practice AutoCAD as a Beginner
The best way to learn AutoCAD is through practical projects rather than only watching tutorials.
Step 1: Learn Basic Commands
Start with Line, Circle, Rectangle, Move, Copy, Trim, Extend, and Offset.
Step 2: Practice Simple Shapes
Create:
- Squares
- Rectangles
- Circles
- Polygons
- Simple geometric
- Patterns
Step 3: Learn Layers
Create separate layers for different drawing elements.
Step 4: Practice Dimensions
Add accurate dimensions to your drawings.
Step 5: Create a Simple Floor Plan
Try creating:
- External walls
- Internal walls
- Doors
- Windows
- Rooms
- Staircase
- Dimensions
Step 6: Practice Printing
Learn how to create a layout, set scale, and export the drawing as PDF.
Common AutoCAD Mistakes Beginners Should Avoid
1. Drawing Without Setting Units
Always check your drawing units before starting.
2. Using Only One Layer
A professional drawing should be properly organized using multiple layers.
3. Ignoring Object Snap
Incorrect snapping can lead to inaccurate geometry.
4. Drawing at the Wrong Scale
Create objects at their actual size in Model Space and manage print scale through layouts/viewports.
5. Using Too Many Exploded Objects
Avoid unnecessarily exploding blocks because it can make drawings harder to manage.
6. Poor Layer Naming
Use clear and consistent layer names.
7. Ignoring Lineweights
Lineweight helps distinguish different elements when the drawing is printed.
8. Not Saving Frequently
Use Ctrl + S regularly to avoid losing work.
AutoCAD Tips for Beginners
Here are some practical tips to improve your drafting workflow:
- Learn keyboard shortcuts.
- Use Object Snap whenever accuracy matters.
- Keep your layers organized.
- Use blocks for repeated objects.
- Use consistent text styles.
- Use appropriate lineweights.
- Draw accurately rather than approximately.
- Keep the Model Space organized.
- Check dimensions before printing.
- Save different project versions when making major changes.
- Practice with real-world floor plans.
- Learn Layout and viewport settings early.
AutoCAD for Architecture and Civil Engineering
AutoCAD is particularly useful for architecture and civil engineering students and professionals.
1. Architectural Applications
AutoCAD can be used to create:
- Floor Plans
- Elevations
- Sections
- Door and window layouts
- Furniture layouts
- Site plans
- Staircase drawings
- Working Drawings
2. Civil Engineering Applications
Civil engineers can use AutoCAD for:
- Site layouts
- Road drawings
- Drainage layouts
- Survey drawings
- Structural drawings
- Foundation layouts
- Reinforcement details
- Construction drawings
3. Structural Drawing Applications
AutoCAD can also be used to prepare:
- Column layouts
- Beam layouts
- Footing layouts
- Slab drawings
- Reinforcement details
- Structural sections
A Simple AutoCAD Beginner Workflow
A practical workflow for a basic architectural drawing can look like this:
Set Units → Create Layers → Draw Basic Geometry → Use Object Snap → Create Walls → Add Doors & Windows → Add Dimensions → Add Text → Apply Hatch → Check Drawing → Create Layout → Set Scale → Plot/Export PDF
Following a consistent workflow can reduce errors and make your drawings easier to manage.
It is important to understand that learning the basics of AutoCAD lays the foundation for creating accurate and professional technical drawings. Beginners should focus on understanding the interface, coordinate systems, drawing commands, modification tools, layers, object snaps, dimensions, blocks, layouts, and printing.
You do not need to learn every AutoCAD command immediately. Start with the most frequently used commands and practice them using real-world projects, such as simple floor plans, structural layouts, and construction drawings.
With consistent practice and the right workflow, AutoCAD can become a powerful tool for architecture, civil engineering, structural design, and construction documentation.
You can check out the articles on MS Design Hub for a wide range of AutoCAD tutorials, architectural drawings, civil engineering guides, house plans, and construction tips.
Frequently Asked Questions
Is AutoCAD difficult for beginners?
AutoCAD can feel complicated initially because it has many tools and commands. However, beginners can learn it progressively by starting with basic drawing and modification commands.
How long does it take to learn AutoCAD basics?
The time required depends on your practice and previous experience. With regular hands-on practice, beginners can learn the fundamental commands and workflow relatively quickly.
Which AutoCAD commands should beginners learn first?
Start with Line, Circle, Rectangle, Move, Copy, Offset, Trim, Extend, Rotate, Mirror, Hatch, Dimension, Layer, and Block.
Is AutoCAD useful for civil engineering students?
Yes. AutoCAD is commonly used for creating and editing technical drawings related to civil engineering, architecture, construction, and structural design.
Can I create a house plan in AutoCAD?
Yes. AutoCAD can be used to create detailed house plans including walls, rooms, doors, windows, stairs, dimensions, furniture layouts, and other architectural elements.
What is the difference between AutoCAD and CAD?
CAD means Computer-Aided Design, which is the broader concept of using computers for design and drafting. AutoCAD is a specific CAD software application.